Flutter UI 渲染浅析(四)Build
系列文章的第四篇,本篇文章主要分析下 Element.rebuild() 过程。
源码基于 Flutter v1.20.4。
在 Flutter UI 渲染浅析(二)VSync 注册 这篇文章中提到,C++ Engine 接收到 VSync 信号后,需要做三件事情:
- 执行 Dart Framework
dart:ui 包下的 _beginFrame()
- 执行 microtasks 任务
- 执行 Dart Framework
dart:ui 包下的 _drawFrame()
上一篇文章 Flutter UI 渲染浅析(三)Animation 原理 中分析了 _beginFrame() 的过程。
然后接着去处理在 Animate 过程中触发的 microtasks 任务,一般为 Ticker 或者 AnimationController 中 Future 的完成回调。
本篇文章分析下 _drawFrame() 的前半部分—— Element.rebuild() 的过程。
1、_handleDrawFrame()
同上篇文章的逻辑一样,调用到 Dart Framework 的SchedulerBinding._handleDrawFrame() 方法。
1 2 3 4 5 6 7 8 9 10 11 12 13 14 15 16 17 18 19 20 21 22 23 24 25 26 27 28 29 30 31 32 33 34 35
| void _handleDrawFrame() { if (_ignoreNextEngineDrawFrame) { _ignoreNextEngineDrawFrame = false; return; } handleDrawFrame(); } void handleDrawFrame() { assert(_schedulerPhase == SchedulerPhase.midFrameMicrotasks); Timeline.finishSync(); try { _schedulerPhase = SchedulerPhase.persistentCallbacks; for (final FrameCallback callback in _persistentCallbacks) _invokeFrameCallback(callback, _currentFrameTimeStamp); _schedulerPhase = SchedulerPhase.postFrameCallbacks; final List<FrameCallback> localPostFrameCallbacks = List<FrameCallback>.from(_postFrameCallbacks); _postFrameCallbacks.clear(); for (final FrameCallback callback in localPostFrameCallbacks) _invokeFrameCallback(callback, _currentFrameTimeStamp); } finally { _schedulerPhase = SchedulerPhase.idle; Timeline.finishSync(); _currentFrameTimeStamp = null; } }
|
主要做了两件事情:
- 遍历
_persistentCallbacks,由 WidgetsBinding.addPersistentFrameCallback() 注册,从名字也可以看出,它是一个需要持久回调的列表,所以不可删除,每次绘制过程都会回调
- 遍历
_postFrameCallbacks,由 WidgetsBinding.addPostFrameCallback() 注册,只会回调一次,调用过后清除回调列表,一般用于监听绘制完成后处理一些任务
下面主要看下_persistentCallbacks 的执行过程。
1.1、RendererBinding.drawFrame()
在 Flutter UI 渲染浅析(二)VSync 注册 这篇文章中,我们简单分析了 7 个 Binding 类的作用及其初始化顺序。
在 RendererBinding 在初始化过程中,注册了_persistentCallbacks 回调,如下。
1 2 3 4 5 6 7 8 9 10 11 12 13 14 15 16 17 18 19 20 21 22 23 24 25 26 27 28 29 30 31 32
| mixin RendererBinding on BindingBase, ServicesBinding, SchedulerBinding, GestureBinding, SemanticsBinding, HitTestable { @override void initInstances() { super.initInstances(); _instance = this; _pipelineOwner = PipelineOwner( onNeedVisualUpdate: ensureVisualUpdate, onSemanticsOwnerCreated: _handleSemanticsOwnerCreated, onSemanticsOwnerDisposed: _handleSemanticsOwnerDisposed, ); window ..onMetricsChanged = handleMetricsChanged ..onTextScaleFactorChanged = handleTextScaleFactorChanged ..onPlatformBrightnessChanged = handlePlatformBrightnessChanged ..onSemanticsEnabledChanged = _handleSemanticsEnabledChanged ..onSemanticsAction = _handleSemanticsAction; initRenderView(); _handleSemanticsEnabledChanged(); addPersistentFrameCallback(_handlePersistentFrameCallback); ... } ... void _handlePersistentFrameCallback(Duration timeStamp) { drawFrame(); _mouseTracker.schedulePostFrameCheck(); }
|
_handlePersistentFrameCallback(Duration timeStamp) 方法是 _persistentCallbacks 回调列表的一个子元素,其中去调用 drawFrame() 方法。
由于 WidgetsFlutterBinding 的混入顺序
1 2 3 4 5 6 7 8
| class WidgetsFlutterBinding extends BindingBase with GestureBinding, SchedulerBinding, ServicesBinding, PaintingBinding, SemanticsBinding, RendererBinding, WidgetsBinding { static WidgetsBinding ensureInitialized() { if (WidgetsBinding.instance == null) WidgetsFlutterBinding(); return WidgetsBinding.instance; } }
|
WidgetsBinding 在 RendererBinding 之后,所以会先执行 WidgetsBinding.drawFrame() 方法。
WidgetsBinding.drawFrame() 实现:
1 2 3 4 5 6 7 8 9 10 11 12 13 14 15 16 17 18 19 20 21 22 23 24 25 26 27 28 29 30 31
| mixin WidgetsBinding on BindingBase, ServicesBinding, SchedulerBinding, GestureBinding, RendererBinding, SemanticsBinding { @override void initInstances() { super.initInstances(); _instance = this; _buildOwner = BuildOwner(); buildOwner.onBuildScheduled = _handleBuildScheduled; window.onLocaleChanged = handleLocaleChanged; window.onAccessibilityFeaturesChanged = handleAccessibilityFeaturesChanged; SystemChannels.navigation.setMethodCallHandler(_handleNavigationInvocation); FlutterErrorDetails.propertiesTransformers.add(transformDebugCreator); } @override void drawFrame() { ... try { if (renderViewElement != null) buildOwner.buildScope(renderViewElement); super.drawFrame(); buildOwner.finalizeTree(); } ... } }
|
- buildOwner.buildScope() 触发Widget Tree、Element Tree、RenderObject Tree三棵树的构建或刷新过程
- super.drawFrame() 调用父类的 drawFrame() 方法,由于
WidgetsBinding 混入了 RendererBinding ,所以这里会去调用 RendererBinding.drawFrame() ,下篇文章会继续分析
- buildOwner.finalizeTree() 卸载未激活状态的 Element 节点。未激活状态的节点在一个绘制帧周期内,是有可能被重新激活的,如果没有重新激活,那么就卸载掉
1.3、BuildOwner.buildScope()
1 2 3 4 5 6 7 8 9 10 11 12 13 14 15 16 17 18 19 20 21 22 23 24 25 26 27 28 29 30 31 32 33 34 35 36 37 38 39 40 41 42 43 44 45 46
| void buildScope(Element context, [ VoidCallback callback ]) { Timeline.startSync('Build', arguments: timelineArgumentsIndicatingLandmarkEvent); try { _scheduledFlushDirtyElements = true; if (callback != null) { _dirtyElementsNeedsResorting = false; callback(); } _dirtyElements.sort(Element._sort); _dirtyElementsNeedsResorting = false; int dirtyCount = _dirtyElements.length; int index = 0; while (index < dirtyCount) { try { _dirtyElements[index].rebuild(); } index += 1; if (dirtyCount < _dirtyElements.length || _dirtyElementsNeedsResorting) { _dirtyElements.sort(Element._sort); _dirtyElementsNeedsResorting = false; dirtyCount = _dirtyElements.length; while (index > 0 && _dirtyElements[index - 1].dirty) { index -= 1; } } } } finally { for (final Element element in _dirtyElements) { element._inDirtyList = false; } _dirtyElements.clear(); _scheduledFlushDirtyElements = false; _dirtyElementsNeedsResorting = null; Timeline.finishSync(); } }
|
- 执行回调,在 App 启动时
WidgetsFlutterBinding.ensureInitialized()
  ..scheduleAttachRootWidget(app)
会用到,用于构建出三棵树,callback 为 element.mount(null, null);
_dirtyElements 脏列表重排序,在等待 VSync 信号回调过程中,有可能又有新的标脏节点进来- 脏列表中的节点,即调用了
State.setState() 的节点,触发 Element.rebuild() 更新三棵树,这里的重点也是Element.rebuild()。
- 清除 Element 脏标记,清空脏列表
1.4、Element.rebuild()
1 2 3 4 5 6 7 8 9 10
| void rebuild() { ... if (!_active || !_dirty) return; performRebuild(); } @protected void performRebuild();
|
逻辑比较简单,调用 performRebuild(),它是一个空方法,实现在子类。
在继续分析后续流程之前,先简单梳理下 Widget、Element 与 RenderObject 之间的关系,以及三棵树与 Layer Tree 之间的关系。
Flutter 开发者最熟悉的就是 Widget 了。
Widget 是面向开发者的接口,它是对UI的描述性表达,即是用于描述 Element 的配置的。
Widget 是声明式的 UI 结构,开发者通过组合 Widget 构建出想要的UI效果。
Widget 是不可变的(immutable),这就意味着每次刷新,都会重新构建出新的Widget对象,创建的开销很小,成本较低。
我们通常将 Widget 组合构建出的 UI 层级结构称为 Widget Tree,但相比 Element Tree,实际上并不存在 Widget Tree,由于 Widget 节点挂载在 Element 节点上,所以我们可以抽象为 Widget Tree。
Widget 提供 createElement() 和 createRenderObject() (并不是所有)用于构建 Element 和 RenderObject。

Widget 主要有三种类型:
- ProxyWidget 代理类,不直接参与构建UI,它们可以为其他 Widget 提供一些附加信息。例如
InheritedWidget 可以在其子树中传递附加信息;ParentDataWidget 用于提供其子树的布局信息
- ComponentWidget 组合类,不直接参与绘制,它们用来组合包装用来构建复杂的UI布局。一般都是
StatefullWidget 或者 StatelessWidget 的子类,例如 RaisedButton 、Scaffold、Text、 GestureDetector、 Container 等
- RenderObjectWidget 绘制类,可以构建出 RenderObject 用来布局和绘制
Element 是响应式编程的基础,频繁的创建 Element 会对性能有影响,所以只有在必要条件下才会创建一个新的 Element 对象,大部分情况下会进行复用,主要包含两个职责:
- 持有 Widget 和 RenderObject 的引用,协调二者之间的数据绑定关系
- 根据 Widget 的变化来创建或更新 Element Tree,包括挂载、更新、更改位置、卸载等
Element 和 Widget 是一一对应的关系,同样类型的 Widget 构建出同样类型的 Element。

RenderObject 用来布局和绘制,处理输入事件等。
Element 和 RenderObject 不是一一对应的,只有可以绘制的节点才有 RenderObject 对象。
Render Tree 用来布局和绘制 RenderObject 节点,最终生成 Layer Tree 提交给 C++ Engine。它的根节点是 RenderView。
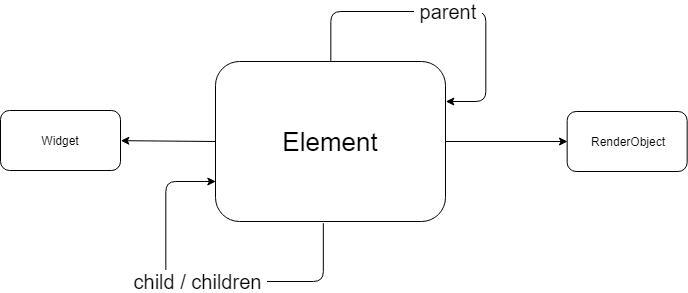
他们三者之间的关系:

Element 持有 Widget 引用和 RenderObject 应用(可能没有),Widget 用来构建 RenderObject 对象。
对于 StatefullElement 来说,它还会持有 State 的引用。
这里需要注意,Element 的 child 是 Widget 中 build() 方法构建出来的 Widget 所对应的 Element,下面会用到。
Widget、Element、RenderObject 构建出三棵树 Widget Tree、Element Tree、Render Tree,它们共同组成了 Flutter 对于UI的组织描述。
前两棵树可以认为是面向开发者的,它们构成了声明式UI、响应式UI的基础,Render Tree 用来真正的布局和绘制,最后生成 Layer Tree,并保存在 Scene 对象中,提交给 C++ Engine 做光栅化合成。
那么,可不可以绕开 Widget、Element、RenderObject 来进行绘制,其实是可以的,它们只是用来组织描述绘制信息的,我们可以直接拿到 Canvas 进行绘制,只要最终可以生成Layer Tree 保存在 Scene 中就可以。
例如 这个例子 🌰 。
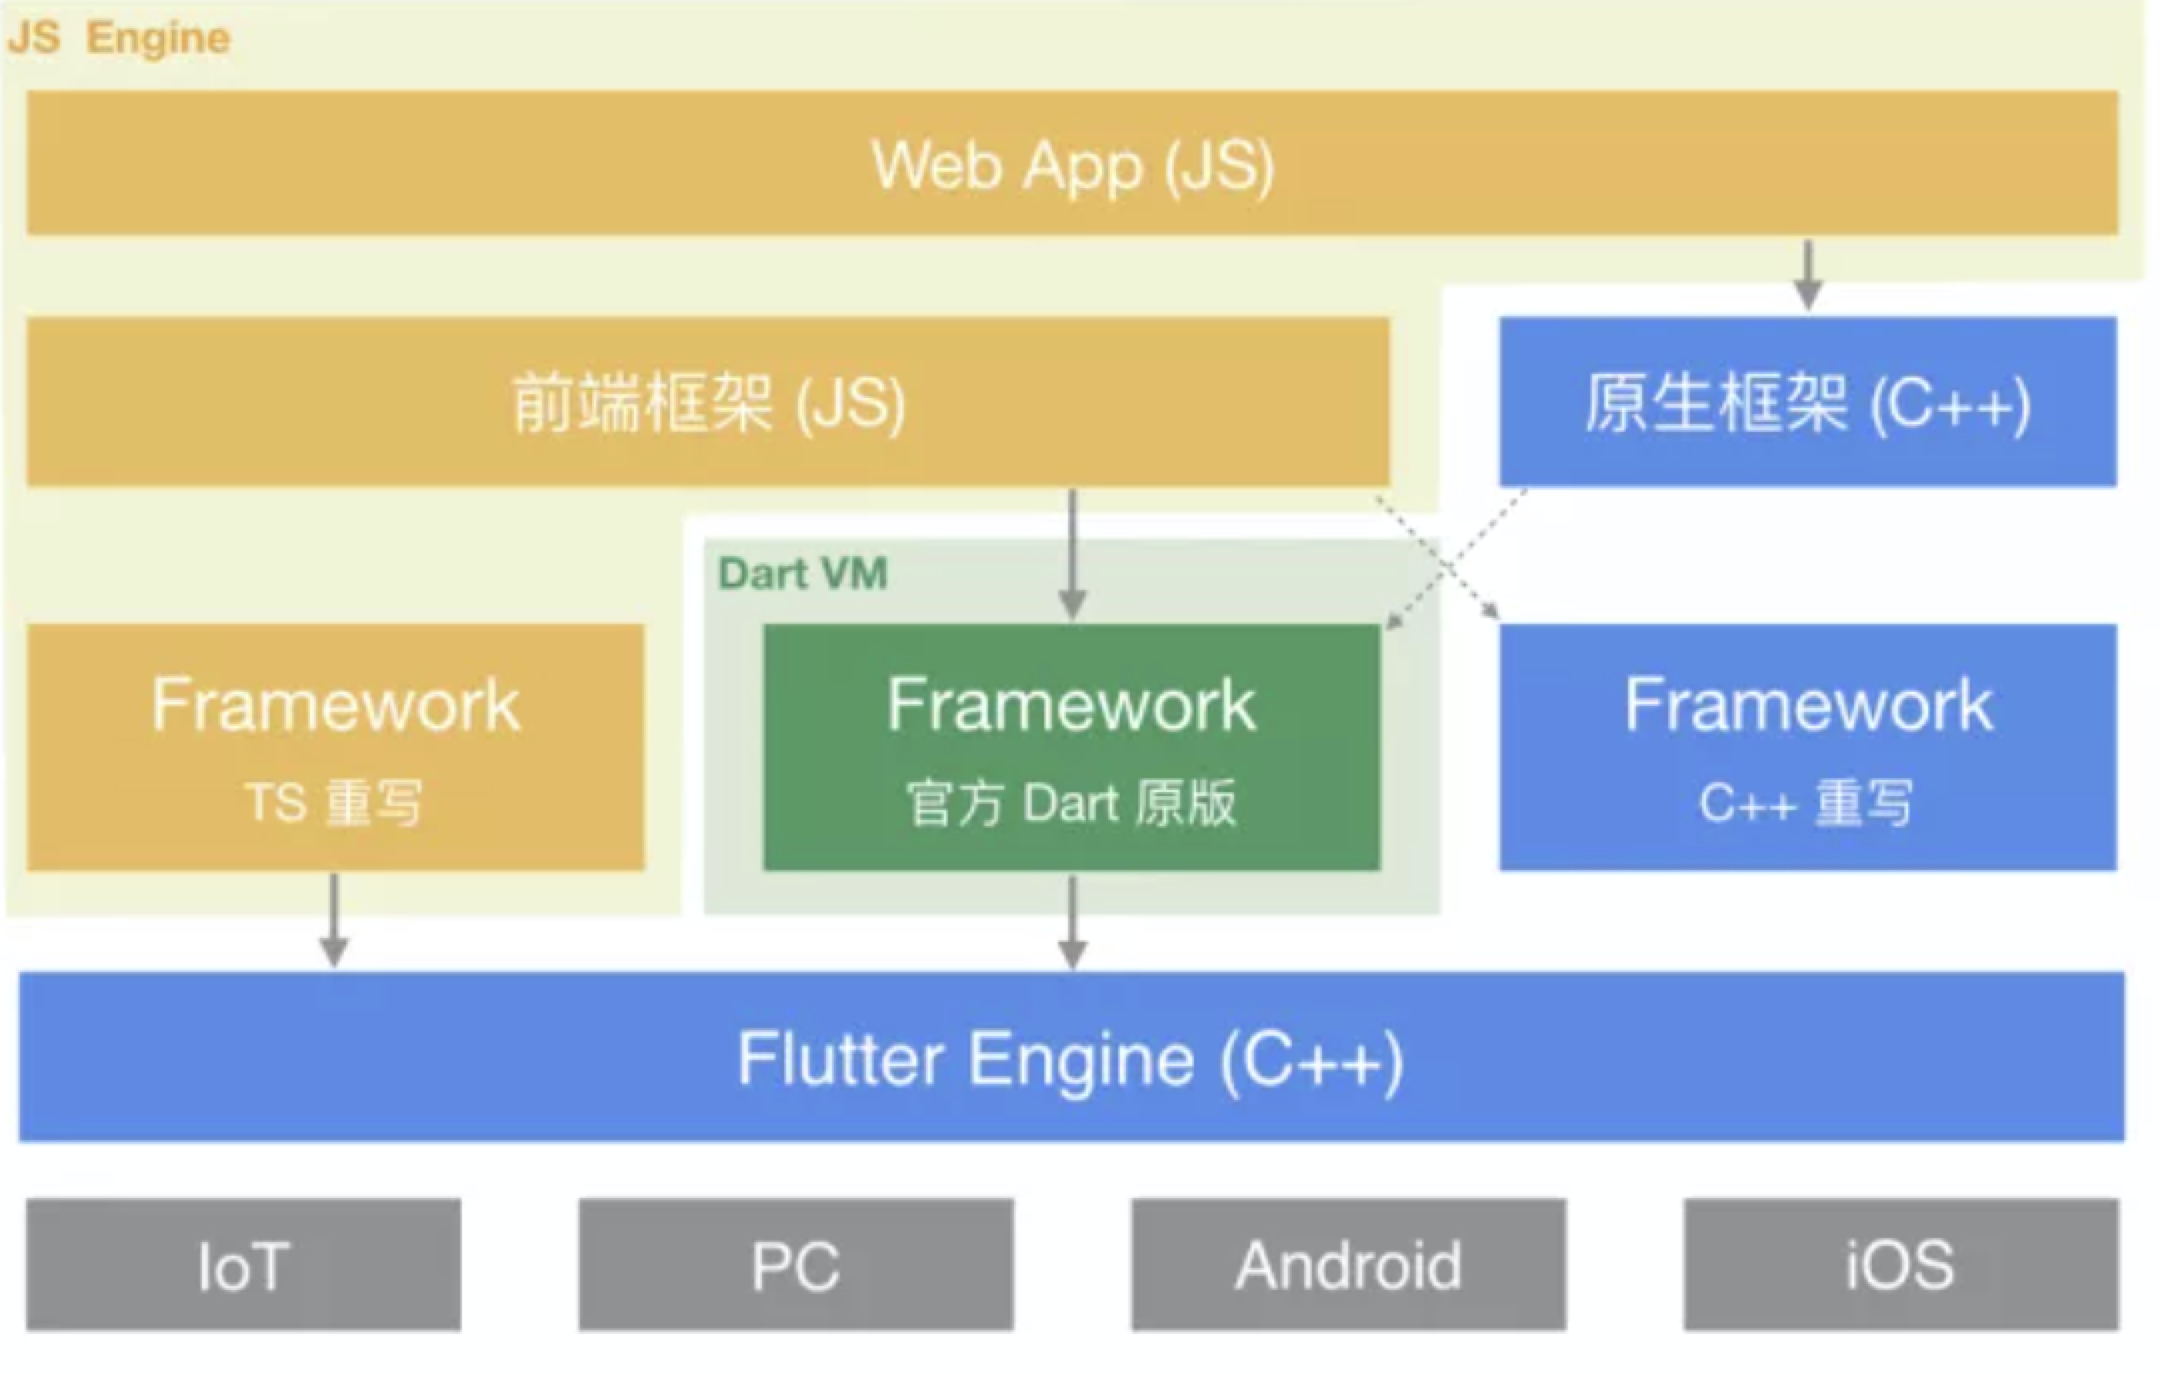
更进一步的,甚至可以绕过或者舍弃 Dart Framework,直接对接 C++ Engine,任何可以组织描述UI绘制结构的组织形式,理论上都可以桥接到 C++ Engine。
例如基于 W3C 标准的 CSS + JS/TS 组织的UI描述,通过绑定JS与C++ Engine,将绘制信息发送给 Engine,理论上也是可行的,如下图

继续上面分析到 Element.performRebuild()。

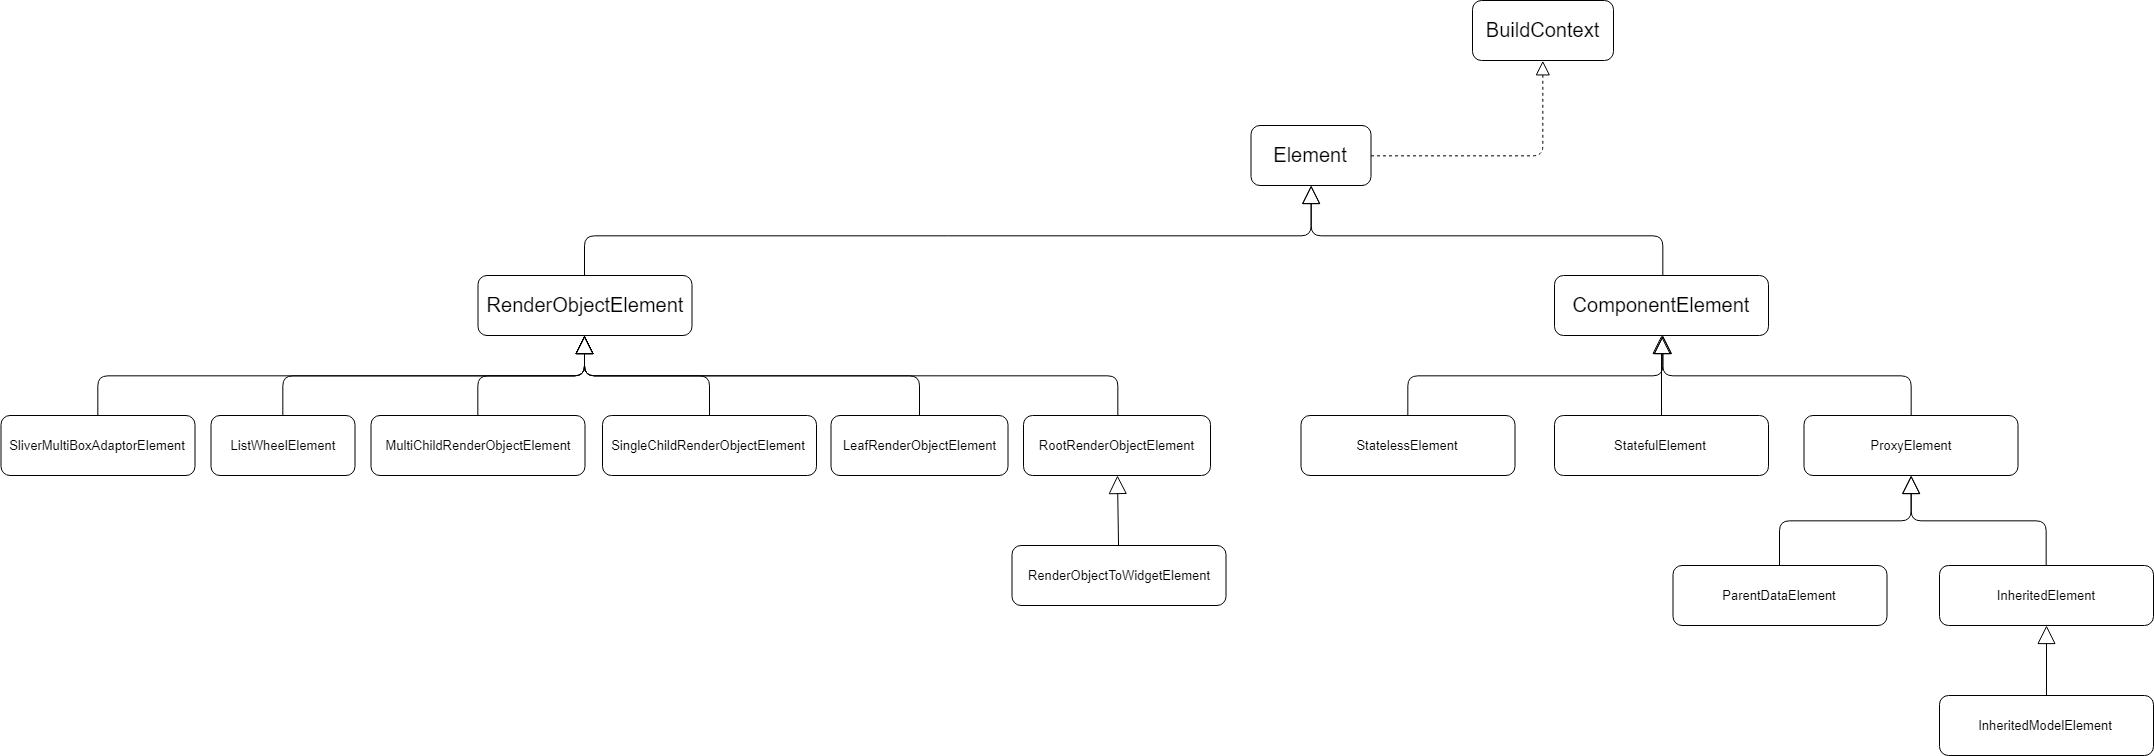
分 Element 类型看下实现
ComponentElement:
1 2 3 4 5 6 7 8 9 10 11 12 13 14 15 16 17 18 19 20 21 22 23 24 25 26 27 28 29 30 31 32 33 34 35 36
| @override void performRebuild() { Widget built; try { ... built = build(); ... } catch (e, stack) { _debugDoingBuild = false; built = ErrorWidget.builder(); } finally { _dirty = false; } try { ... _child = updateChild(_child, built, slot); } catch (e, stack) { built = ErrorWidget.builder(); _child = updateChild(null, built, slot); } } @override void performRebuild() { if (_didChangeDependencies) { _state.didChangeDependencies(); _didChangeDependencies = false; } super.performRebuild(); }
|
主要做了两件事情:
build() 构建子 Widget,注意这里是 子Widget_updateChild() 创建或更新子Element,注意这里是 子Element
为什么强调子Widget和子Element,因为在这个Element对象中,它对应的 Widget 和 Element 就是Element自己合它持有的 Widget。这里很容易搞混。
RenderObjectElement:
1 2 3 4 5 6 7 8 9 10 11 12 13 14 15 16 17 18 19 20
| @override void performRebuild() { ... widget.updateRenderObject(this, renderObject); } class Stack extends MultiChildRenderObjectWidget { @override void updateRenderObject(BuildContext context, RenderStack renderObject) { assert(_debugCheckHasDirectionality(context)); renderObject ..alignment = alignment ..textDirection = textDirection ?? Directionality.of(context) ..fit = fit ..clipBehavior = overflow == Overflow.visible ? Clip.none : clipBehavior; } }
|
widget.updateRenderObject() 的作用是把 Widget 中的属性值,绑定到 RenderObject 中,属性的类型一一对应。
3.1、Element.build()
build() 在各个类型的 Element 的实现:
1 2 3 4 5 6 7 8 9 10 11
| @override Widget build() => _state.build(this); @override Widget build() => widget.build(this); @override Widget build() => widget.child;
|
3.2、Element.updateChild()
这个方法是响应式UI的基础,也是 Dart Framework 的核心方法之一,看下实现:
1 2 3 4 5 6 7 8 9 10 11 12 13 14 15 16 17 18 19 20 21 22 23 24 25 26 27 28 29 30 31 32 33 34 35
| @protected Element updateChild(Element child, Widget newWidget, dynamic newSlot) { if (newWidget == null) { if (child != null) deactivateChild(child); return null; } Element newChild; if (child != null) { bool hasSameSuperclass = true; ... if (hasSameSuperclass && child.widget == newWidget) { if (child.slot != newSlot) updateSlotForChild(child, newSlot); newChild = child; } else if (hasSameSuperclass && Widget.canUpdate(child.widget, newWidget)) { if (child.slot != newSlot) updateSlotForChild(child, newSlot); child.update(newWidget); newChild = child; } else { deactivateChild(child); newChild = inflateWidget(newWidget, newSlot); } } else { newChild = inflateWidget(newWidget, newSlot); } return newChild; }
|
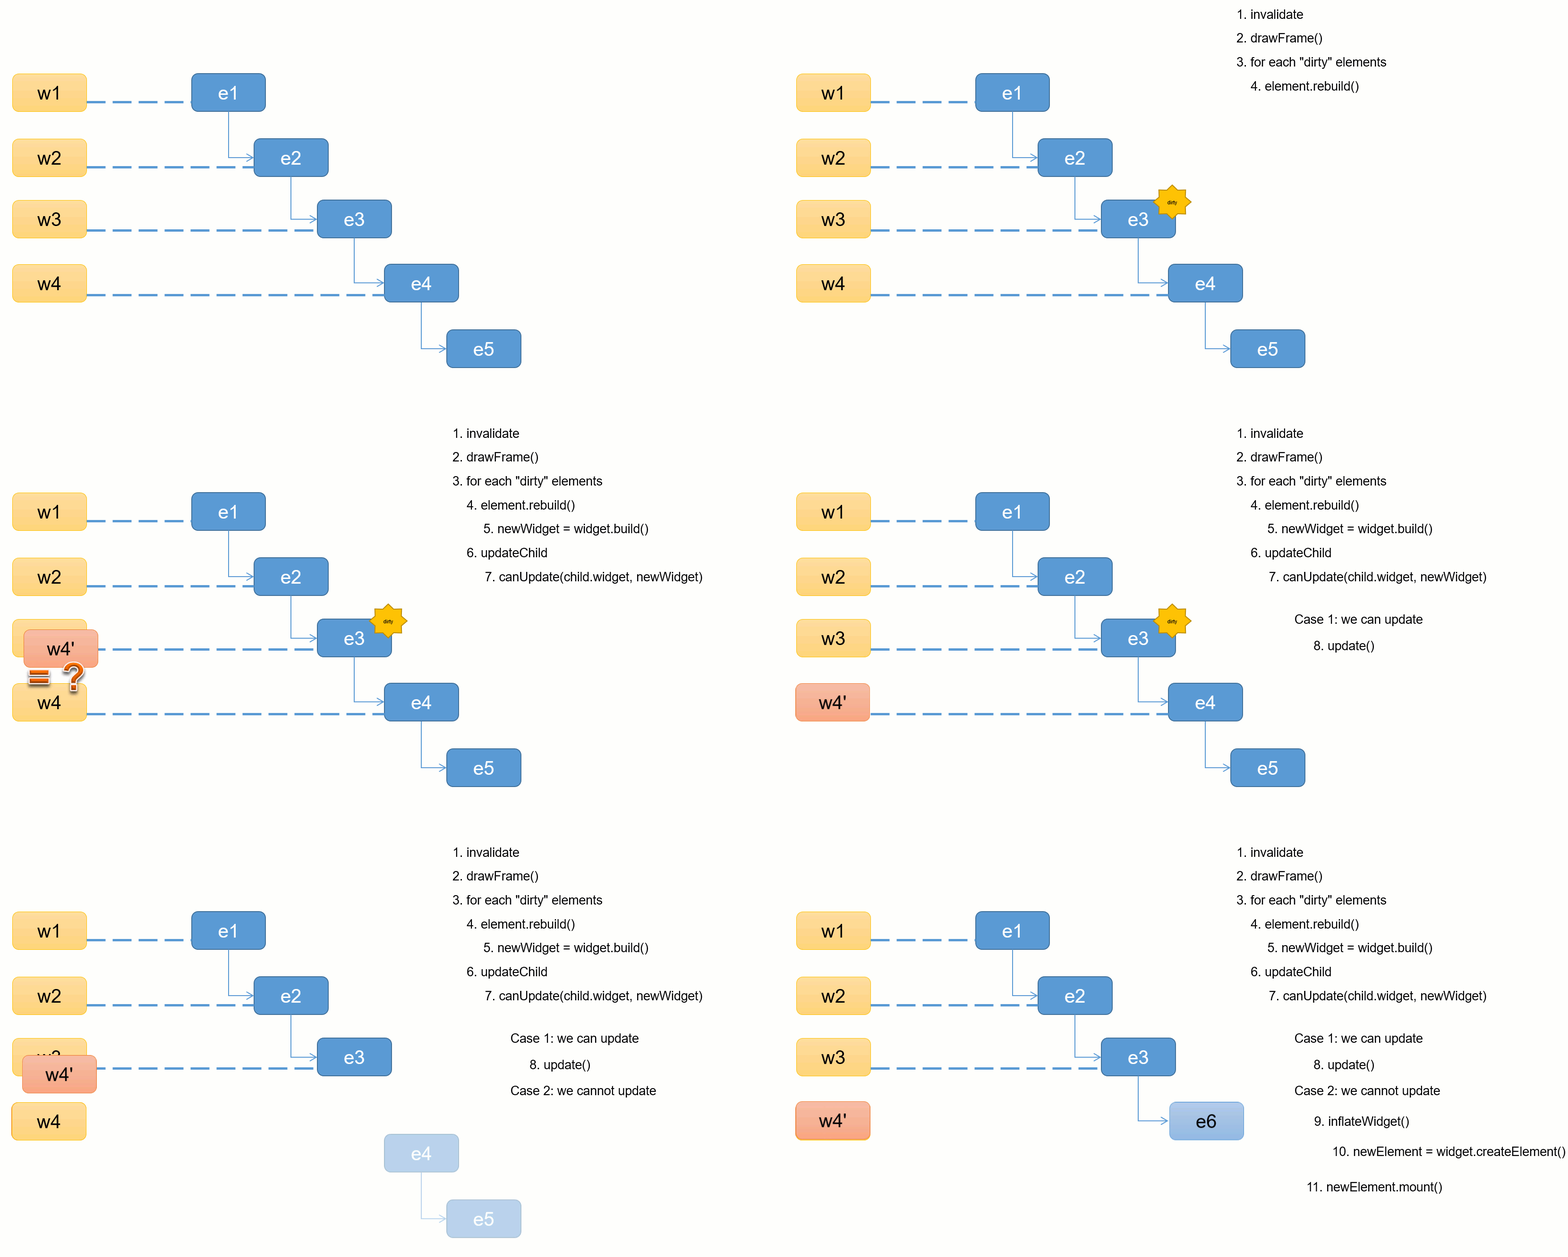
首先要先明确,这个方法是用来更新子树的,第一个参数 child 是 子Element,第二个参数newWidget是 子Widget 。
分几种情况:
- case 1:newWidget 为空,也就是当前 Element 节点对应的 Widget build() 返回了空,那么标记child为非激活状态(当前帧绘制完成后会被卸载),然后返回空
- case 2:如果child不为空,也就是之前构建过一次子Element
- case 2.1:如果子Element对应的widget 即 child.widget 和新构建的 newWidget 相等,直接更新子widget,如果插槽不同,更新下插槽
- case 2.2:如果
Widget.canUpdate(child.widget, newWidget) ,判断标准是 runtimeType 和key 都相等,那么调用 update() 更新 child
- case 2.3:否则child不可复用,标记child为非激活状态(当前帧绘制完成后会被卸载),然后构建出一个新的 Element 节点,挂载到Element Tree上
- case 3:否则 child 为空,不可复用,构建出一个新的 Element 节点,挂载到Element Tree上
下面看下几个关键的方法
3.3、Element.update()
Element 类实现:
1 2 3 4 5
| @mustCallSuper void update(covariant Widget newWidget) { _widget = newWidget; }
|
直接更新 Element 子节点的 _widget 引用。
子类复写该方法必须调用super。
看下子类的实现。
3.3.1、RenderObjectElement.update()
1 2 3 4 5 6 7 8
| abstract class RenderObjectElement extends Element { @override void update(covariant RenderObjectWidget newWidget) { super.update(newWidget); widget.updateRenderObject(this, renderObject); _dirty = false; } }
|
同上面一样,把 newWidget 中的属性值,绑定到 RenderObject 中。
SingleChildRenderObjectElement、MultiChildRenderObjectElement 是 RenderObjectElement 的子类,分别看下实现。
1 2 3 4 5 6 7 8
| class SingleChildRenderObjectElement extends RenderObjectElement { @override void update(SingleChildRenderObjectWidget newWidget) { super.update(newWidget); _child = updateChild(_child, widget.child, null); } }
|
- 调用super,复用 RenderObjectElement.update() 逻辑
- 更新子树
1 2 3 4 5 6 7 8
| class MultiChildRenderObjectElement extends RenderObjectElement { @override void update(MultiChildRenderObjectWidget newWidget) { super.update(newWidget); _children = updateChildren(_children, widget.children, forgottenChildren: _forgottenChildren); _forgottenChildren.clear(); } }
|
- 调用super,复用 RenderObjectElement.update() 逻辑
- 通过差分算法将新构造的 widget.children 绑定到已有的 _children 上来更新子树,updateChildren() 逻辑虽然看起来很多,但是还比较好理解,这里就不放源码了,说下逻辑
- 首先从 topIndex 到 bottomIndex 遍历 oldChildElement 和 newChildWidget,如果
Widget.canUpdate(oldChild.widget, newWidget),那么updateChild()更新子树 updateChild(),直到匹配失败,记录 topIndex 累加值
- 从 bottomIndex 到 topIndex 遍历oldChildElement 和 newChildWidget,直到匹配失败,记录 bottomIndex 累减值,这里不更新子树
- 遍历缩小了的 oldChildElement 列表,记录 oldChild.widget.key 和 oldChild 到 map,key为空的反激活
- 遍历缩小了的 newChildWidget 列表,匹配 map 中的key类型,
updateChild() 更新子树,未匹配到的反激活
- 最后更新第二步得到剩余的部分
3.3.2、StatefullElement.update()
1 2 3 4 5 6 7 8 9 10 11 12 13
| @override void update(StatefulWidget newWidget) { super.update(newWidget); final StatefulWidget oldWidget = _state._widget; _dirty = true; _state._widget = widget as StatefulWidget; final dynamic debugCheckForReturnedFuture = _state.didUpdateWidget(oldWidget) as dynamic; rebuild(); }
|
- 调用 super
- 更新 state 中 widget 的引用
- 调用 _state.didUpdateWidget(oldWidget)
- 调用
rebuild() 更新子树,由于 rebuild() 一定会触发 build() 方法调用,所以这里进行标脏
StatelessElement.update() 类似,不写出来了。
1 2 3 4 5 6 7 8 9 10 11 12 13 14 15 16 17 18
| @protected Element inflateWidget(Widget newWidget, dynamic newSlot) { final Key key = newWidget.key; if (key is GlobalKey) { final Element newChild = _retakeInactiveElement(key, newWidget); if (newChild != null) { newChild._activateWithParent(this, newSlot); final Element updatedChild = updateChild(newChild, newWidget, newSlot); return updatedChild; } } final Element newChild = newWidget.createElement(); newChild.mount(this, newSlot); return newChild; }
|
- 如果key类型是 GlobalKey,从非激活状态的列表中尝试匹配类型相同的节点,抢救性复用一下
- 通过 Widget,创建对应的 Element
- 挂载到 Element Tree 上
3.5、Element.mount()
挂载到Element Tree上
1 2 3 4 5 6 7 8 9 10 11 12 13 14 15 16 17 18 19 20 21
| @mustCallSuper void mount(Element parent, dynamic newSlot) { _parent = parent; _slot = newSlot; _depth = _parent != null ? _parent.depth + 1 : 1; _active = true; if (parent != null) _owner = parent.owner; final Key key = widget.key; if (key is GlobalKey) { key._register(this); } _updateInheritance(); }
|
- 更新父节点信息
- 更新插槽信息
- 更新深度
- 从初始化状态更改为激活状态
- 绑定 BuildOwner 对象
- 如果是 GlobalKey,注册到公共map,全局复用
- 从 parent 更新 _inheritedWidgets,用于传递附加信息
如果子类复写该方法,那么必须要调用 super。
3.5.1、ComponentElement.mount()
1 2 3 4 5 6 7 8 9 10 11
| abstract class ComponentElement extends Element { @override void mount(Element parent, dynamic newSlot) { super.mount(parent, newSlot); _firstBuild(); } void _firstBuild() { rebuild(); } }
|
- 调用 super() 调用
Element.mount()
- 调用 _firstBuild() -> rebuild() -> performRebuild() 构建 Element 子树
下面还有 SingleChildRenderObjectElement 、MultiChildRenderObjectElement 等子类,逻辑跟update()差不多,就不列出来了。
3.5.2、RenderObjectElement.mount()
1 2 3 4 5 6 7 8 9 10 11
| abstract class RenderObjectElement extends Element { @override void mount(Element parent, dynamic newSlot) { super.mount(parent, newSlot); _renderObject = widget.createRenderObject(this); attachRenderObject(newSlot); _dirty = false; } }
|
- 调用 super() 调用
Element.mount()
- 构建 RenderObject
- 将 RenderObject 挂载到 Render Tree 上
3.6、RenderObjectElement.attachRenderObject()
1 2 3 4 5 6 7 8 9 10 11 12 13 14 15 16 17 18 19
| abstract class RenderObjectElement extends Element { @override void attachRenderObject(dynamic newSlot) { _slot = newSlot; _ancestorRenderObjectElement = _findAncestorRenderObjectElement(); _ancestorRenderObjectElement?.insertChildRenderObject(renderObject, newSlot); final ParentDataElement<ParentData> parentDataElement = _findAncestorParentDataElement(); if (parentDataElement != null) _updateParentData(parentDataElement.widget); } void _updateParentData(ParentDataWidget<ParentData> parentDataWidget) { ... parentDataWidget.applyParentData(renderObject); } }
|
- Element Tree 向上遍历祖先节点,找到第一个 RenderObject 节点
- 根据规则插入到 Render Tree 中,需要子类实现,这里就构建出了 Render Tree,为下面 Layout、Paint 等过程做准备,下篇文章会详细分析
- Element Tree 向上遍历祖先节点,找到第一个 ParentDataElement 节点,ParentDataElement 节点中记录着布局位置等信息,如果没有找到返回空
- 根据 ParentDataElement 找到对应的 ParentDataWidget,调用
applyParentData()
其中,ParentDataElement 根据参数绑定了 ParentDataWidget 类型,并通过泛型绑定了 ParentData 类型。
ParentDataWidget 是 ProxyWidget 的子类,它的子类包括 Flexible、LayoutId、Positioned、KeepAlive 等Widget。
ParentDataWidget 使用泛型绑定了 ParentData 类型。
以 Flexible 为例看下实现:
1 2 3 4 5 6 7 8 9 10 11 12 13 14 15 16 17 18 19 20 21 22 23
| class Flexible extends ParentDataWidget<FlexParentData> { @override void applyParentData(RenderObject renderObject) { final FlexParentData parentData = renderObject.parentData as FlexParentData; bool needsLayout = false; if (parentData.flex != flex) { parentData.flex = flex; needsLayout = true; } if (parentData.fit != fit) { parentData.fit = fit; needsLayout = true; } if (needsLayout) { final AbstractNode targetParent = renderObject.parent; if (targetParent is RenderObject) targetParent.markNeedsLayout(); } } }
|
- 更新布局属性信息
- RenderObject 节点 Layout 标脏,记录在
BuildOwner._nodesNeedingLayout 列表中,等待下一步 Layout 处理
4、总结
本篇文章介绍了 WidgetsBinding.drawFrame() 的过程,以及 Widget、Element、RenderObject 及三棵树的关系,梳理了build() 过程在三棵树之间的流转关系,通过 Element Tree 和 Widget Tree 构建 Render Tree,最终触发 RenderObject.markNeedsLayout() Layout 标脏操作,记录在 BuildOwner._nodesNeedingLayout 列表中,等待下一步 Layout 处理。
下一篇文章将继续分析 Render Tree 的构建过程及 RendererBinding.drawFrame() 中 Layout 过程。
参考
本文链接: http://w4lle.com/2020/11/16/flutter-ui-build/
版权声明:本文为 w4lle 原创文章,可以随意转载,但必须在明确位置注明出处!
本文链接: http://w4lle.com/2020/11/16/flutter-ui-build/


