w4lle's Notes

人生如逆旅,我亦是行人。

w4lle's avatar w4lle

Flutter UI 渲染浅析(五)Layout

系列文章的第五篇,本篇文章主要分析下 Render Tree 的构建及 Layout 过程。

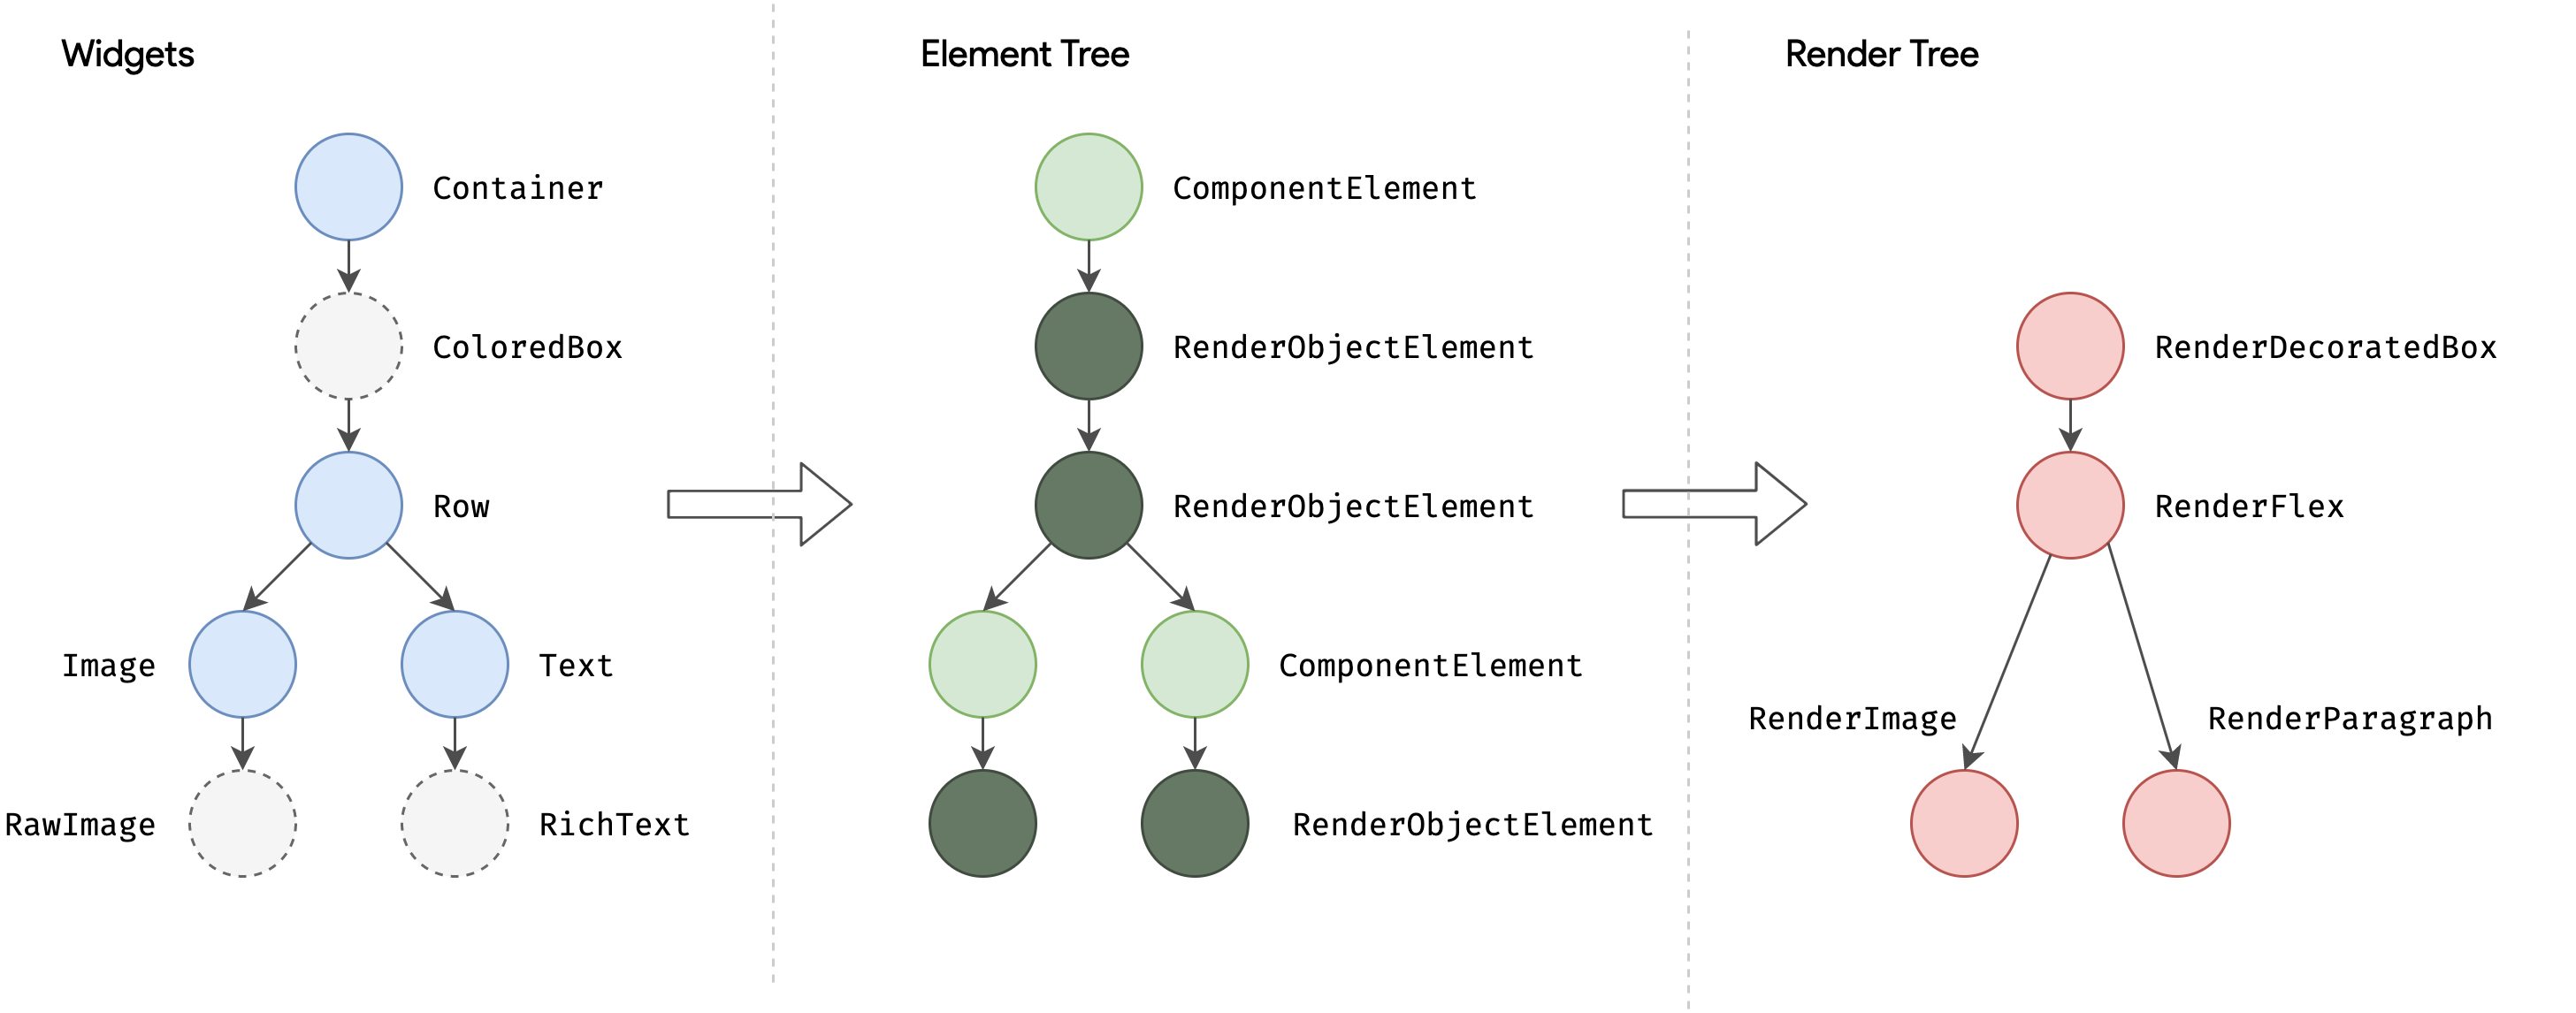
在上篇文章结尾,提到 RenderObjectElement.attachRenderObject() 方法中调用 RenderObjectElement.insertChildRenderObject(renderObject, newSlot) 将 RenderObject 插入 Render Tree中,继续分析下 Render Tree 的构建过程及 RendererBinding.drawFrame() 过程。

在开始之前,先看下 RenderObject 和 RenderTree。

1、RenderObject

RenderObject 是 Render Tree 的构成节点,主要负责布局和绘制。

前面提到过,并不是所有的 Element 都会持有 RenderObject 的引用,只有 RenderObjectWidget 及其对应 RenderObjectElement 才会创建 RenderObject。

1
abstract class RenderObject extends AbstractNode with DiagnosticableTreeMixin implements HitTestTarget {

RenderObject 继承自 AbstractNodeAbstractNode 是树形节点定义,持有 parent 引用,提供了挂载 adoptChild()、卸载 dropChild()、计算深度 redepthChildren() 等方法。

同时持有 ParentData 对象,可以存放子节点的一些特定信息,比如布局信息等。

下篇文章要分析的 Layer 也是 AbstractNode 的子类。

RenderObject 混入了 HitTestTargetHitTestTarget 提供了处理事件的能力。

RenderObject 定义了通用的布局和绘制协议。

但是没有定义坐标系统,例如子节点是布局在笛卡尔坐标系,还是极坐标系。

也没有指定具体的布局协议,例如是通过宽高,还是通过约束和大小,或者父节点在子节点的布局前后设置位置和大小。

或者子节点是否允许方法其自身的 ParentDara 对象信息。

也没有定义子树模型,比如其是否支持挂载子节点,允许挂载几个子节点等,这些能力由RenderObject 子类 mixin 提供。
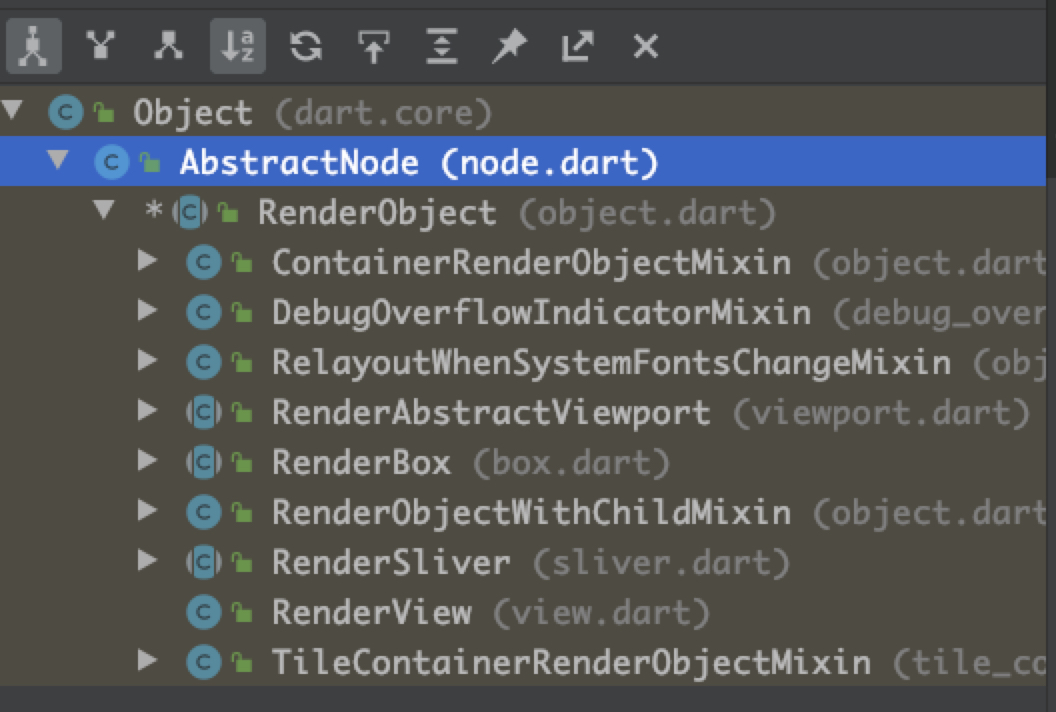
RenderObject 的子类中

  • mixin RenderObjectWithChildMixin<ChildType extends RenderObject> 定义了允许挂载一个子节点的实现
  • mixin ContainerRenderObjectMixin<ChildType extends RenderObject, ParentDataType extends ContainerParentDataMixin<ChildType>> 定义了允许挂载多个子节点的实现
  • RenderView 是根节点,用于App启动初始化Widget、Element、RenderObject、Layer,绘制完成后将Layer Tree 提交给 Engine
  • RenderBox 是最重要的一个子类,其实现了基于 2D 笛卡尔坐标系的布局方式,其中的 Offset 定义距父布局的偏移量 x、y,Size 定义了该控件的大小。这种布局方式是和 Android、iOS 原生布局一致的。约束模型对应 BoxConstraints 盒约束
  • RenderSlive 实现了支持滑动效果的布局方式,可以通过 ViewViewPort 内嵌到 RenderBox 中,约束模型对应于 SliverConstraints 分片约束

RenderObject类型、Constraints类型和ParentData类型对应关系如下:

RenderObject 类型 Constraints类型 ParentData类型
RenderBox BoxConstraints BoxParentData
RenderSlive SliverConstraints SliverLogicalParentData

2、RenderTree 构建

继续分析上篇文章的结尾部分 RenderObjectElement.insertChildRenderObject()

在Flutter v1.21 及以上版本上,该方法被废弃,使用 RenderObjectElement.insertRenderObjectChild(renderObject, newSlot); 代替。

该方法是个空方法,需要子类实现。

1
2
3
4
5
6
abstract class RenderObjectElement extends Element {
@protected
void insertRenderObjectChild(covariant RenderObject child, covariant dynamic slot) {
insertChildRenderObject(child, slot);
}
}

以单子节点和多子节点Element为例,看下构建流程。

2.1、单子节点

单子节点实现:

1
2
3
4
5
6
7
8
9
10
11
12
class SingleChildRenderObjectElement extends RenderObjectElement {
@override
SingleChildRenderObjectWidget get widget => super.widget as SingleChildRenderObjectWidget;
...
@override
void insertRenderObjectChild(RenderObject child, dynamic slot) {
final RenderObjectWithChildMixin<RenderObject> renderObject = this.renderObject as RenderObjectWithChildMixin<RenderObject>;
renderObject.child = child;
}
}
  • 获取 Element.mount() 过程中通过 Widget.createRenderObject() 已经构建好的 RenderObject
  • 将 RenderObject 挂载到 Render Tree

SingleChildRenderObjectElement 通过 SingleChildRenderObjectWidget.createElement()创建。

SingleChildRenderObjectWidget 的子类包括:

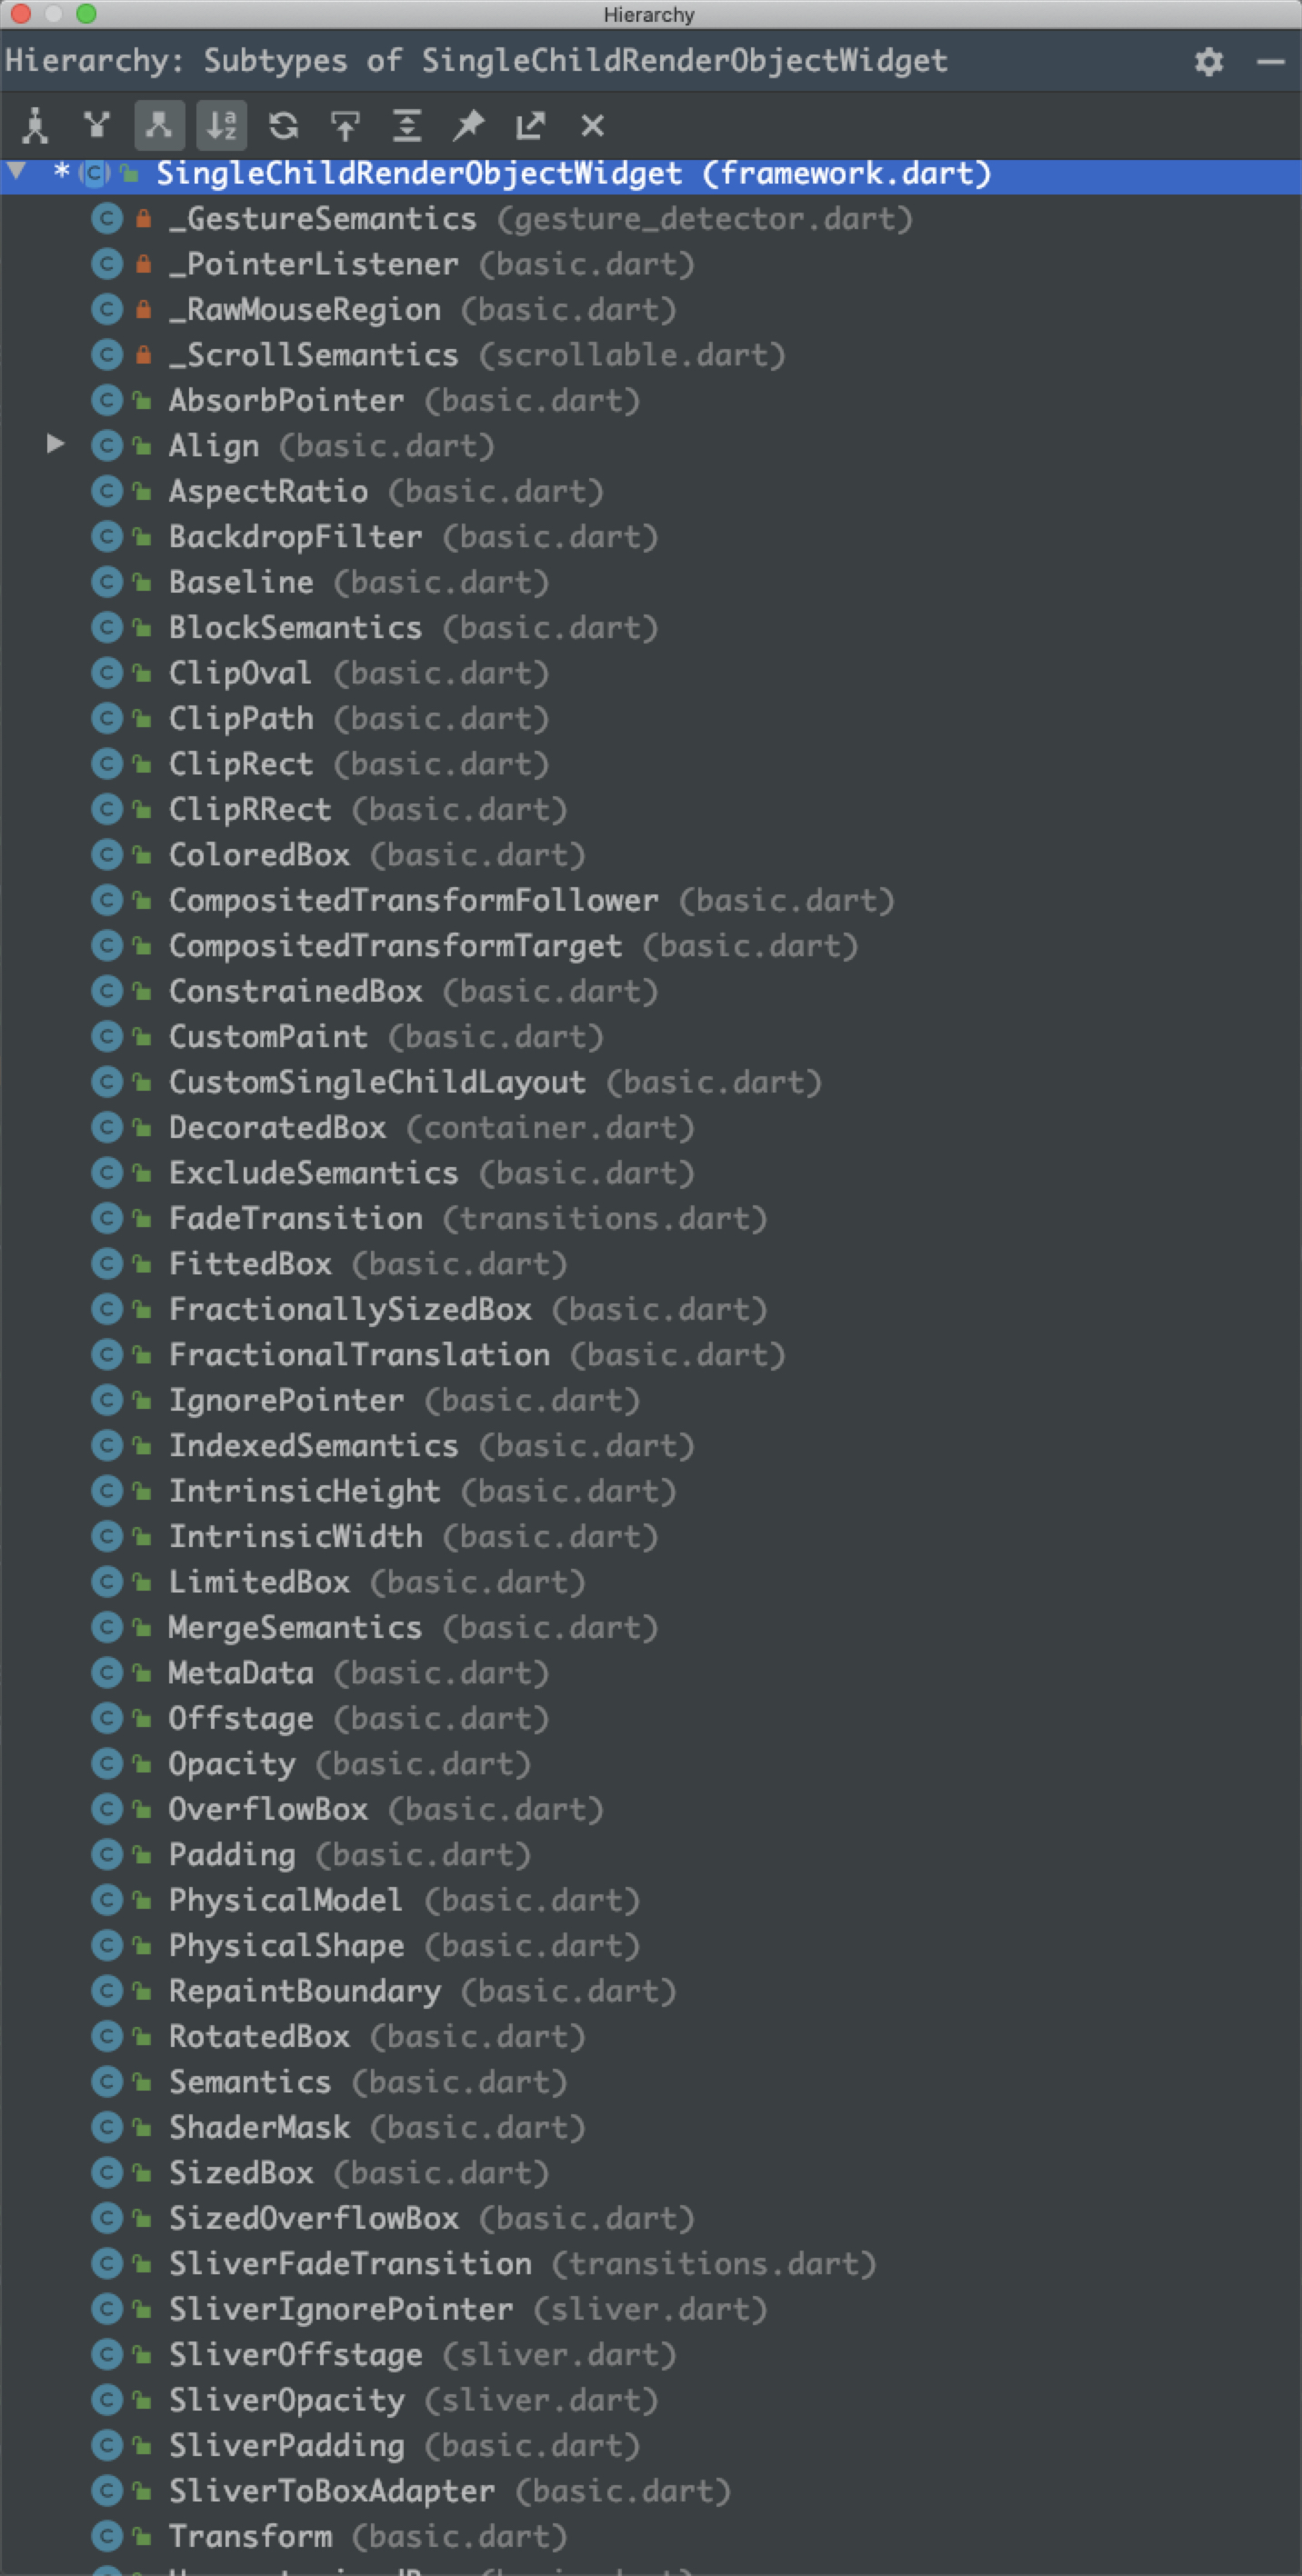
对应的RenderObject 通过 SingleChildRenderObjectWidget.createRenderObject() 创建,创建出的 RenderObject 混入了 RenderObjectWithChildMixin。

上面提到 RenderObjectWithChildMixin 定义了允许挂载一个子节点的实现。

1
2
3
4
5
6
7
8
9
10
11
12
13
14
15
16
17
18
19
20
21
22
23
24
25
26
27
28
mixin RenderObjectWithChildMixin<ChildType extends RenderObject> on RenderObject {
set child(ChildType? value) {
if (_child != null)
// 卸载老节点
dropChild(_child!);
// 更新子节点引用
_child = value;
if (_child != null)
// 挂载新节点
adoptChild(_child!);
}
}
abstract class RenderObject extends AbstractNode with DiagnosticableTreeMixin implements HitTestTarget {
@override
void adoptChild(RenderObject child) {
// 初始化 ParentData
setupParentData(child);
// Layout标脏
markNeedsLayout();
// 合成位标脏
markNeedsCompositingBitsUpdate();
// 辅助信息Semantic标脏
markNeedsSemanticsUpdate();
// 调用AbstractNode.adoptChild(),挂载到 Render Tree,将child.parent指向自己,更新树的深度
super.adoptChild(child);
}
}
  • 卸载老节点
  • 更新子节点引用
  • 调用 RenderObject.adoptChild() 挂载新节点
    • 初始化 ParentData
    • markNeedsLayout Layout标脏
    • markNeedsCompositingBitsUpdate 合成位标脏
    • markNeedsSemanticsUpdate 辅助信息Semantic标脏
    • 调用AbstractNode.adoptChild(),挂载到 Render Tree,将child.parent指向自己,更新树的深度

2.2、多子节点实现

以 MultiChildRenderObject 为例,看下多子节点实现。

1
2
3
4
5
6
7
8
9
10
11
class MultiChildRenderObjectElement extends RenderObjectElement {
@override
MultiChildRenderObjectWidget get widget => super.widget as MultiChildRenderObjectWidget;
@override
void insertRenderObjectChild(RenderObject child, IndexedSlot<Element> slot) {
final ContainerRenderObjectMixin<RenderObject, ContainerParentDataMixin<RenderObject>> renderObject =
this.renderObject as ContainerRenderObjectMixin<RenderObject, ContainerParentDataMixin<RenderObject>>;
renderObject.insert(child, after: slot?.value?.renderObject);
}
}
  • 获取 Element.mount() 过程中通过 Widget.createRenderObject() 已经构建好的 RenderObject
  • 将 RenderObject 挂载到 Render Tree

MultiChildRenderObjectElement 通过 MultiChildRenderObjectWidget.createElement()创建。MultiChildRenderObjectWidget 的子类包含:

定义了多子节点实现,最终调用 ContainerParentDataMixin 将 RenderObject 挂载到 Render Tree 上。

1
2
3
4
5
6
7
8
9
10
11
12
13
14
15
16
17
18
19
20
21
22
23
24
25
26
27
28
29
30
31
32
33
34
35
36
37
38
39
40
mixin ContainerRenderObjectMixin<ChildType extends RenderObject, ParentDataType extends ContainerParentDataMixin<ChildType>> on RenderObject {
void insert(ChildType child, { ChildType? after }) {
adoptChild(child);
_insertIntoChildList(child, after: after);
}
...
void _insertIntoChildList(ChildType child, { ChildType? after }) {
final ParentDataType childParentData = child.parentData as ParentDataType;
_childCount += 1;
if (after == null) {
// 依附的兄弟节点为空,插入在第一个子节点
childParentData.nextSibling = _firstChild;
if (_firstChild != null) {
final ParentDataType _firstChildParentData = _firstChild!.parentData as ParentDataType;
_firstChildParentData.previousSibling = child;
}
_firstChild = child;
_lastChild ??= child;
} else {
final ParentDataType afterParentData = after.parentData as ParentDataType;
if (afterParentData.nextSibling == null) {
// 依附的兄弟节点没有相关联的下一个兄弟节点,插入在兄弟节点队尾
childParentData.previousSibling = after;
afterParentData.nextSibling = child;
_lastChild = child;
} else {
// 依附的兄弟节点有相关联的下一个兄弟节点,插入在兄弟节点中间
childParentData.nextSibling = afterParentData.nextSibling;
childParentData.previousSibling = after;
// set up links from siblings to child
final ParentDataType childPreviousSiblingParentData = childParentData.previousSibling!.parentData as ParentDataType;
final ParentDataType childNextSiblingParentData = childParentData.nextSibling!.parentData as ParentDataType;
childPreviousSiblingParentData.nextSibling = child;
childNextSiblingParentData.previousSibling = child;
}
}
}
...
}
  • 调用 RenderObject.adoptChild() 挂载新节点
    • 初始化 ParentData
    • markNeedsLayout Layout标脏
    • markNeedsCompositingBitsUpdate 合成位标脏
    • markNeedsSemanticsUpdate 辅助信息Semantic标脏
    • 调用AbstractNode.adoptChild(),挂载到 Render Tree,将child.parent指向自己,更新树的深度
  • 提供一个兄弟节点,将其关联到兄弟链上,用于后续流程兄弟节点之间遍历,分几种情况
    • 依附的兄弟节点为空,插入在第一个子节点
    • 依附的兄弟节点没有相关联的下一个兄弟节点,插入在兄弟节点队尾
    • 依附的兄弟节点有相关联的下一个兄弟节点,插入在兄弟节点中间

至此,Render Tree 构建完毕,基于 Render Tree 接下来分析下 Layout 的过程。

3、markNeedsLayout 标脏

上面提到,在 RenderObject 节点挂载到 Render Tree 过程中,会触发 markNeedsLayout Layout 标脏操作。

1
2
3
4
5
6
7
8
9
10
11
12
13
14
15
16
17
18
19
20
21
22
23
24
25
26
27
28
abstract class RenderObject extends AbstractNode with DiagnosticableTreeMixin implements HitTestTarget {
void markNeedsLayout() {
// 如果已经标脏,避免重复标脏
if (_needsLayout) {
return;
}
if (_relayoutBoundary != this) {
// 如果 _relayoutBoundary 布局边界不是本节点,那么向上遍历
markParentNeedsLayout();
} else {
// 如果 _relayoutBoundary 布局边界是自本节点,将本节点加入 owner._nodesNeedingLayout 列表,等待 layout 流程处理
_needsLayout = true;
if (owner != null) {
owner!._nodesNeedingLayout.add(this);
owner!.requestVisualUpdate();
}
}
}
@protected
void markParentNeedsLayout() {
...
_needsLayout = true;
final RenderObject parent = this.parent! as RenderObject;
parent.markNeedsLayout();
...
}
}
  • 如果已经标脏,避免重复标脏
  • 如果 _relayoutBoundary 布局边界是自本节点,将本节点加入 PipelineOwner渲染管线中的_nodesNeedingLayout 脏列表,触发 scheduleFrame() 流程,等待 layout 流程处理
  • 如果 _relayoutBoundary 布局边界不是本节点,那么向上遍历,直到找到布局边界,将布局边界节点加入 PipelineOwner渲染管线中的_nodesNeedingLayout 脏列表,触发 scheduleFrame() 流程,等待 layout 流程处理

_relayoutBoundary 布局边界用于优化测量和布局效率,缩小计算范围,通过和 PipelineOwner渲染管线中的_nodesNeedingLayout 脏列表配合,仅对标脏节点和布局边界子树进行测量和布局,达到布局次线性复杂度。

_relayoutBoundary 有两个地方赋值:

  1. RenderView 根节点,在 App 启动过程中调用 RenderObject.scheduleInitialLayout() 方法,_relayoutBoundary = this; 赋值
  2. RenderObject Layout 阶段,在特定条件下,一些节点会被标记为_relayoutBoundary,这个我们后面详细分析

所以,在App启动后第一次布局绘制时,只有根节点 RenderView 是_relayoutBoundary,其余符合条件的节点,只有在首次布局测量时,在Layout阶段触发 layout() 方法进行标注,在下一次布局阶段生效。

4、RendererBinding.drawFrame()

上一篇文章结尾,我们提到 WidgetsBinding.drawFrame() 流程触发 rebuild(),接着触发 RendererBinding.drawFrame() 流程,看下方法实现。

1
2
3
4
5
6
7
8
9
10
11
12
13
// lib/src/rendering/binding.dart
@protected
void drawFrame() {
assert(renderView != null);
pipelineOwner.flushLayout();
pipelineOwner.flushCompositingBits();
pipelineOwner.flushPaint();
if (sendFramesToEngine) {
renderView.compositeFrame(); // this sends the bits to the GPU
pipelineOwner.flushSemantics(); // this also sends the semantics to the OS.
_firstFrameSent = true;
}
}

通过PipelineOwner渲染管线和Flutter Engine进行交互,执行以下过程:

  • pipelineOwner.flushLayout() 布局阶段,遍历Layout被标脏的 RenderObject,调用 performLayout() 完成测量和布局工作
  • pipelineOwner.flushCompositingBits() 标记合成阶段,遍历合成位标脏被标脏的RenderObject,标记那些repaintBoundary==true 的节点及其子节点为需要合成(Compisiting),为下一步合成layer做准备
  • pipelineOwner.flushPaint() 绘制阶段,遍历绘制被标脏的RenderObject,执行绘制操作,并通过PaintingContext记录到PictureLayer,最终生成一颗LayerTree
  • renderView.compositeFrame()合成阶段,遍历Dart Framework LayerTree,构建Engine LayerTree & Scene,将绘制数据通过Flutter Engine发送给GPU
  • pipelineOwner.flushSemantics() 语义阶段,遍历辅助信息被标脏的RenderObject,执行_updateSemantics()更新语义

在Element.rebuild、布局、绘制、合成、语义这几个阶段,有很通用的处理流程

  1. RenderObject 节点先被标脏,记录在脏列表中
  2. 接着脏列表中的节点,在 RendererBinding.drawFrame() 中被分别处理

通过遍历脏列表,再加上中布局节点和绘制阶段,分别通过 _relayoutBoundary_repaintBoundary进行优化,最终达到整个整个流程都是次线性的,这也就是为什么说 Flutter 绘制高效的根本原因。

#5、flushLayout()

看下方法实现

1
2
3
4
5
6
7
8
9
10
11
12
13
14
15
16
17
18
19
20
21
22
23
24
// lib/src/rendering/binding.dart
void flushLayout() {
if (!kReleaseMode) {
//记录Layout过程
Timeline.startSync('Layout', arguments: timelineArgumentsIndicatingLandmarkEvent);
}
try {
while (_nodesNeedingLayout.isNotEmpty) {
final List<RenderObject> dirtyNodes = _nodesNeedingLayout;
_nodesNeedingLayout = <RenderObject>[];
//广度优先
for (final RenderObject node in dirtyNodes..sort((RenderObject a, RenderObject b) => a.depth - b.depth)) {
if (node._needsLayout && node.owner == this)
node._layoutWithoutResize();
}
}
} finally {
...
if (!kReleaseMode) {
//结束 Layout 过程记录
Timeline.finishSync();
}
}
}

遍历PipelineOwner渲染管线中的_nodesNeedingLayout 脏列表中的 ,广度优先原则调用_layoutWithoutResize()方法。

该阶段被记录在Timeline的Layout过程,在UI线程执行。

1
2
3
4
5
6
7
8
9
10
11
12
13
14
15
16
// lib/src/rendering/object.dart
void _layoutWithoutResize() {
// 只有 _relayoutBoundary 节点才会被加入脏列表
assert(_relayoutBoundary == this);
...
try {
//具体的布局操作
performLayout();
// 辅助信息标脏
markNeedsSemanticsUpdate();
}
...
_needsLayout = false;
//_needsPaint标脏,并记录在_nodesNeedingPaint列表中
markNeedsPaint();
}
  • 只有 _relayoutBoundary 节点才会被加入脏列表
  • 测量和布局,performLayout() 是空方法,需要子类实现
  • 辅助信息标脏
  • needsPaint标脏,并记录在_nodesNeedingPaint列表中

由于是广度优先遍历,并且根节点是RenderView,先看下RenderView.performLayout()的实现

1
2
3
4
5
6
7
8
// lib/src/rendering/view.dart
@override
void performLayout() {
_size = configuration.size;
if (child != null)
child.layout(BoxConstraints.tight(_size));
}

根据屏幕最大宽高,生成一个BoxConstraints盒约束,传递给子节点,子节点layout() 用于测量和布局。

看下 RenderObject 的 layout 方法实现:

1
2
3
4
5
6
7
8
9
10
11
12
13
14
15
16
17
18
19
20
21
22
23
24
25
26
27
28
29
30
31
32
33
34
35
36
37
38
void layout(Constraints constraints, { bool parentUsesSize = false }) {
RenderObject? relayoutBoundary;
if (!parentUsesSize || sizedByParent || constraints.isTight || parent is! RenderObject) {
relayoutBoundary = this;
} else {
relayoutBoundary = (parent as RenderObject)._relayoutBoundary;
}
if (!_needsLayout && constraints == _constraints && relayoutBoundary == _relayoutBoundary) {
// 不需要重新布局,直接返回
return;
}
_constraints = constraints;
if (_relayoutBoundary != null && relayoutBoundary != _relayoutBoundary) {
// _relayoutBoundary 边界改变,清理所有子节点的边界信息
visitChildren(_cleanChildRelayoutBoundary);
}
_relayoutBoundary = relayoutBoundary;
if (sizedByParent) {
...
// 依赖父节点传递的约束信息,测量布局大小Size,sizedByParent为true的子节点,需要重写 performResize()
performResize();
}
RenderObject? debugPreviousActiveLayout;
try {
// 触发布局
performLayout();
markNeedsSemanticsUpdate();
} catch (e, stack) {
_debugReportException('performLayout', e, stack);
}
// 清楚标记
_needsLayout = false;
// 绘制标脏
markNeedsPaint();
}

5.1、RelayoutBoundary 布局边界

这里有三个概念比较重要:

  • parentUsesSize :父节点是否依赖子节点的测量布局信息,才能够确定其自身的测量布局信息;默认为 false,为 true 时,当子节点layout标脏时,父节点也要标脏
  • sizedByParent:根据父节点传递过来的约束条件 constraints,就可以唯一确定该节点的 Size 大小,不需要依赖其自身和子节点的属性就可以确定大小。
  • isTight: 当盒约束 BoxConstraint 的 minWidth = maxWidth && minHeight == maxHeight 时,isTight 为true

根据这三个变量,可以确定该节点是否是 relayoutBoundary 布局边界,根本原因是布局边界的触发条件是,本节点不依赖父节点的改变而改变。

布局边界相当于在RenderTree中,插入了一层布局屏障,外界改变不会引起布局边界内子树的改变;同样的,当布局边界子树内部发生布局大小变化,也不会影响父节点重新布局。
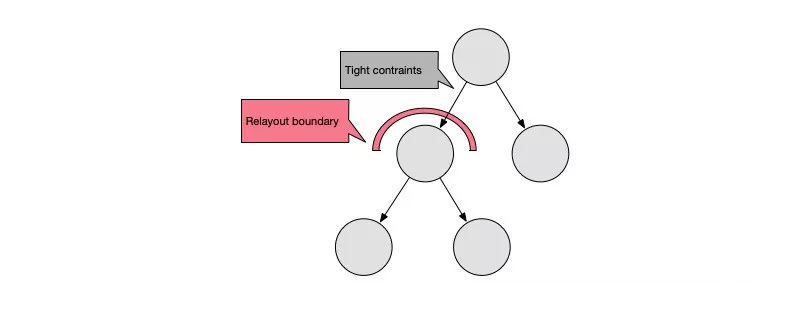
布局边界机制可以提高布局性能。

5.2 Layout 布局

performResize() 用于测量大小,子节点需要重写该方法,根据父节点传递的constraints约束计算大小,结果记录在 _size 中。仅当sizedByParent为true时,会触发该方法。

performLayout() 用于布局,子类需要重写该方法,布局信息存储在当前节点parentData中,后面在绘制阶段会由父节点使用。

在RenderTree中 递归调用 layout()->performLayout()/performResize()->child.layout()->…完成测量和布局。

布局原则:

Constraints go down.

Sizes go up.

Parent sets position.

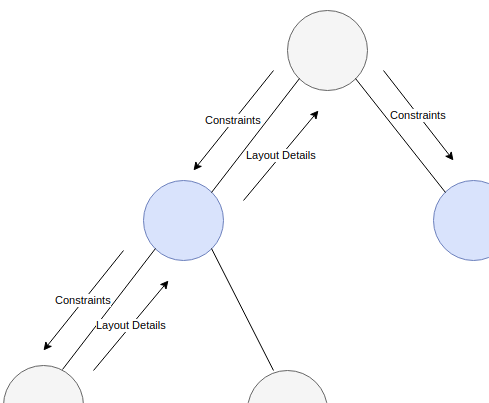
可以理解为约束从高向下传递,子节点根据约束和自身情况确定大小,并向上告知父节点,最终布局情况由父节点确定。

整个布局过程是次线性的。

本篇文章分析了RenderObject及RenderTree的构建,以及RenderTree Layout 布局过程。

下篇文章继续分析下Paint绘制过程。

本文链接: http://w4lle.com/2021/01/15/flutter-ui-layout/

版权声明:本文为 w4lle 原创文章,可以随意转载,但必须在明确位置注明出处!
本文链接: http://w4lle.com/2021/01/15/flutter-ui-layout/