Flutter UI 渲染浅析(六)Paint
系列文章的第六篇,本篇文章继续分析下Paint绘制过程及Layer Tree。
前面的文章分析完了flushLayout,继续分析下 RendererBinding.drawFrame() 剩余部分。
1 2 3 4 5 6 7 8 9 10 11 12 13
| @protected void drawFrame() { assert(renderView != null); pipelineOwner.flushLayout(); pipelineOwner.flushCompositingBits(); pipelineOwner.flushPaint(); if (sendFramesToEngine) { renderView.compositeFrame(); pipelineOwner.flushSemantics(); _firstFrameSent = true; } }
|
1、flushCompositingBits 标记合成阶段
照例分为两部分,标脏&数据处理。
1.1、markNeedsCompositingBitsUpdate 标脏
当RenderObject获取新的子节点或重新挂载时时,会触发adoptChild
1 2 3 4 5 6 7 8 9 10 11
| @override void adoptChild(RenderObject child) { assert(_debugCanPerformMutations); assert(child != null); setupParentData(child); markNeedsLayout(); markNeedsCompositingBitsUpdate(); markNeedsSemanticsUpdate(); super.adoptChild(child); }
|
其中的markNeedsCompositingBitsUpdate
1 2 3 4 5 6 7 8 9 10 11 12 13 14 15 16 17 18 19
| void markNeedsCompositingBitsUpdate() { if (_needsCompositingBitsUpdate) return; _needsCompositingBitsUpdate = true; if (parent is RenderObject) { final RenderObject parent = this.parent as RenderObject; if (parent._needsCompositingBitsUpdate) return; if (!isRepaintBoundary && !parent.isRepaintBoundary) { parent.markNeedsCompositingBitsUpdate(); return; } } ... if (owner != null) owner._nodesNeedingCompositingBitsUpdate.add(this); }
|
做了几件事情:
- 标记_needsCompositingBitsUpdate为true
- 加入到pipelineOwner的_nodesNeedingCompositingBitsUpdate列表中
- 向上寻找第一个isRepaintBoundary为true的节点,递归结束
所以就是把所有不是isRepaintBoundary的RenderObject都加入到了_nodesNeedingCompositingBitsUpdate列表中。
1.2、flushCompositingBits
1 2 3 4 5 6 7 8 9 10 11 12 13 14 15 16 17 18 19
| void flushCompositingBits() { if (!kReleaseMode) { Timeline.startSync('Compositing bits'); } _nodesNeedingCompositingBitsUpdate.sort((RenderObject a, RenderObject b) => a.depth - b.depth); for (final RenderObject node in _nodesNeedingCompositingBitsUpdate) { if (node._needsCompositingBitsUpdate && node.owner == this) node._updateCompositingBits(); } _nodesNeedingCompositingBitsUpdate.clear(); if (!kReleaseMode) { Timeline.finishSync(); } }
|
顺序遍历 _nodesNeedingCompositingBitsUpdate列表,即先遍历父节点,调用RenderObject的 _updateCompositingBits 方法。
过程记录在TimeLine的Compositing bits阶段,运行在UI线程。
1 2 3 4 5 6 7 8 9 10 11 12 13 14 15 16 17 18 19
| void _updateCompositingBits() { if (!_needsCompositingBitsUpdate) return; final bool oldNeedsCompositing = _needsCompositing; _needsCompositing = false; visitChildren((RenderObject child) { child._updateCompositingBits(); if (child.needsCompositing) _needsCompositing = true; }); if (isRepaintBoundary || alwaysNeedsCompositing) _needsCompositing = true; if (oldNeedsCompositing != _needsCompositing) markNeedsPaint(); _needsCompositingBitsUpdate = false; }
|
递归遍历子节点:
- 找到isRepaintBoundary为true的节点,标记_needsCompositing为true
- isRepaintBoundary为true节点的所有父节点,都标记_needsCompositing为true
这些标记在flushPaint过程中会用到。
2、isRepaintBoundary
那么isRepaintBoundary是哪里来的?
1 2 3 4 5 6 7 8 9 10
| abstract class RenderObject extends AbstractNode with DiagnosticableTreeMixin implements HitTestTarget { RenderObject() { _needsCompositing = isRepaintBoundary || alwaysNeedsCompositing; } ... bool get isRepaintBoundary => false; }
|
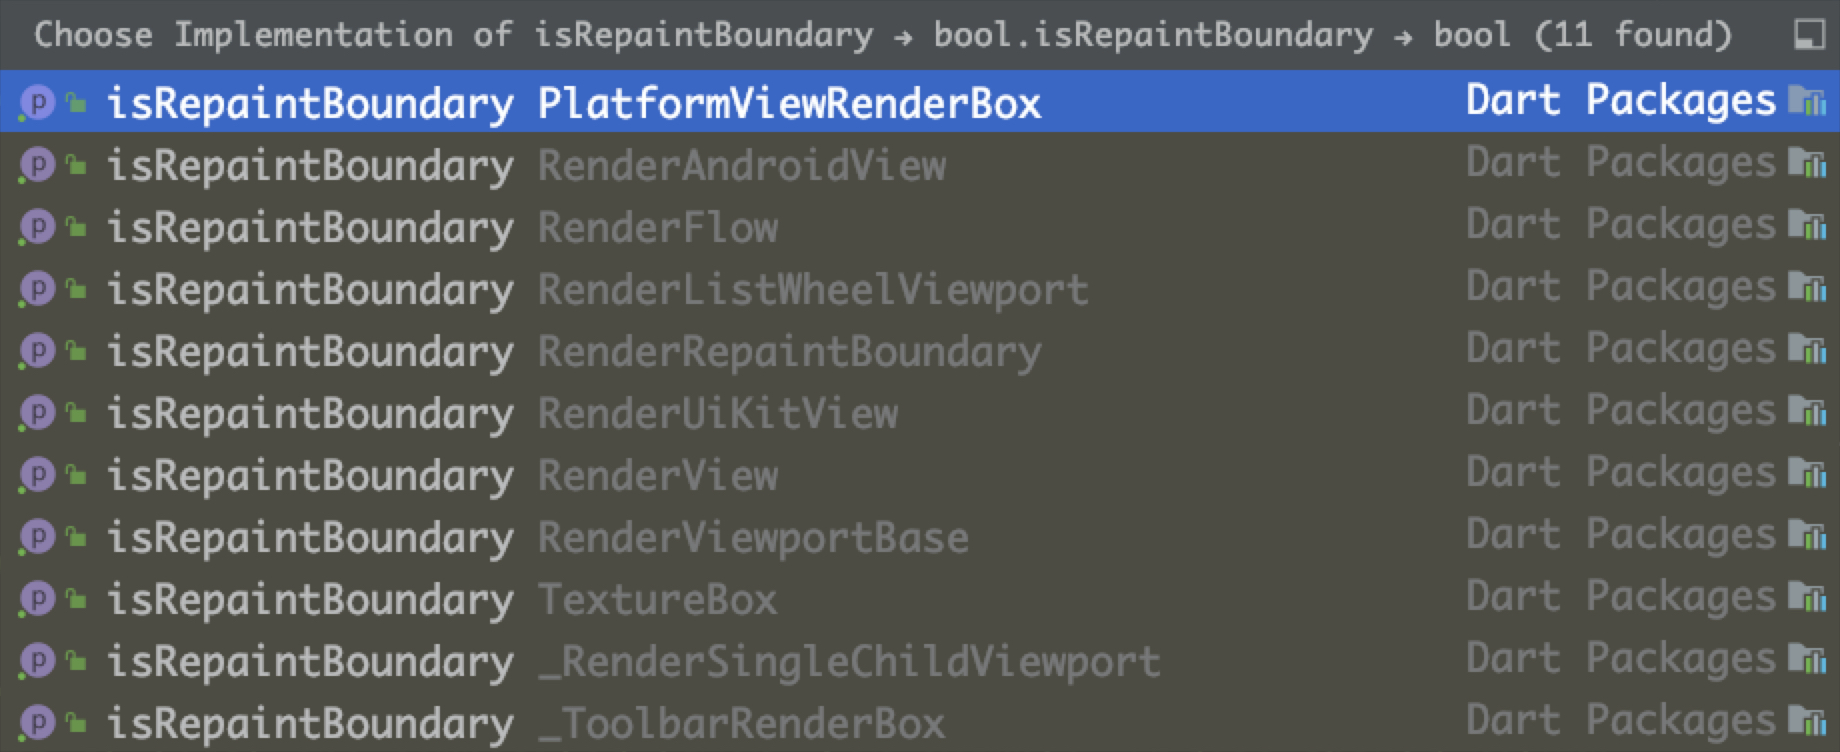
isRepaintBoundary可以被重写,Dart Framework有以下这些RenderObject重写了该值并返回了true,其中包含根节点RenderView和RenderRepaintBoundary。

1 2 3 4 5 6 7 8
| class RenderRepaintBoundary extends RenderProxyBox { RenderRepaintBoundary({ RenderBox child }) : super(child); @override bool get isRepaintBoundary => true; .. }
|
1 2 3 4 5 6 7 8 9 10 11 12 13 14 15 16 17 18 19 20 21 22 23 24 25 26 27 28 29
| class RenderView extends RenderObject with RenderObjectWithChildMixin<RenderBox> { RenderView({ RenderBox child, @required ViewConfiguration configuration, @required ui.Window window, }) : assert(configuration != null), _configuration = configuration, _window = window { this.child = child; } @override bool get isRepaintBoundary => true; void prepareInitialFrame() { scheduleInitialLayout(); scheduleInitialPaint(_updateMatricesAndCreateNewRootLayer()); } TransformLayer _updateMatricesAndCreateNewRootLayer() { _rootTransform = configuration.toMatrix(); final TransformLayer rootLayer = TransformLayer(transform: _rootTransform); rootLayer.attach(this); return rootLayer; } .. }
|
所以除了根节点RenderView外,所有位置在上图中之上的RenderObject节点,都会被标记为_needsCompositing需要合成。
另外,RenderRepaintBoundary对应的Widget是RepaintBoundary,该Widget允许开发者指定图层的绘制层级,也就是绘制边界,用于提高绘制性能。
3、flushPaint 绘制阶段
该阶段主要处理RenderObject的绘制过程。
照例分为两步,标脏&数据处理。
先看一下上文中频繁被调用的markNeedsPaint方法
3.1、markNeedsPaint 标记
上面layout阶段用到了markNeedsPaint()方法
1 2 3 4 5 6 7 8 9 10 11 12 13 14 15 16 17 18 19 20 21 22 23
| void markNeedsPaint() { if (_needsPaint) return; _needsPaint = true; if (isRepaintBoundary) { ... if (owner != null) { owner._nodesNeedingPaint.add(this); owner.requestVisualUpdate(); } } else if (parent is RenderObject) { final RenderObject parent = this.parent as RenderObject; parent.markNeedsPaint(); assert(parent == this.parent); } else { ... if (owner != null) owner.requestVisualUpdate(); } }
|
做了几件事情:
- 如果是isRepaintBoundary,加入到pipelineOwner的_nodesNeedingPaint列表中,并且发起绘制请求,注册VSYNC信号回调,结束流程
- 否则向上遍历
- 如果都不满足,那么只绘制自己,触发绘制frame
isRepaintBoundary可以理解为是否需要独立绘制,如果为true,那么就独立绘制,false就和父节点一起绘制。
下文会详细说明。
通过上面的分析,也就是说只有isRepaintBoundary为true的RenderObject才会被加入到pipelineOwner的_nodesNeedingPaint列表中。
当向上找到isRepaintBoundary时,触发该节点的子树独立绘制流程,流程结束。
3.2、flushPaint
处理_nodesNeedingPaint脏节点。
1 2 3 4 5 6 7 8 9 10 11 12 13 14 15 16 17 18 19 20 21 22 23 24 25 26 27
| void flushPaint() { if (!kReleaseMode) { Timeline.startSync('Paint', arguments: timelineArgumentsIndicatingLandmarkEvent); } ... try { final List<RenderObject> dirtyNodes = _nodesNeedingPaint; _nodesNeedingPaint = <RenderObject>[]; for (final RenderObject node in dirtyNodes..sort((RenderObject a, RenderObject b) => b.depth - a.depth)) { if (node._needsPaint && node.owner == this) { if (node._layer.attached) { PaintingContext.repaintCompositedChild(node); } else { node._skippedPaintingOnLayer(); } } } } finally { if (!kReleaseMode) { Timeline.finishSync(); } } }
|
运行在UI线程,TimeLine记录Paint过程。
从叶子节点逆序遍历 _nodesNeedingPaint列表。
注意这里只有isRepaintBoundary为true的RenderObject才会被加入到pipelineOwner的 _nodesNeedingPaint列表中。
也就是说从下到上寻找绘制边界,然后从绘制边界向下绘制。
继续这个过程直到_nodesNeedingPaint列表为空。
1 2 3 4 5 6 7 8 9 10 11 12 13 14 15 16 17 18 19 20 21 22 23 24 25 26 27 28 29 30 31 32 33 34
| class PaintingContext extends ClipContext { @protected PaintingContext(this._containerLayer, this.estimatedBounds) static void repaintCompositedChild(RenderObject child, { bool debugAlsoPaintedParent = false }) { _repaintCompositedChild( child, debugAlsoPaintedParent: debugAlsoPaintedParent, ); } static void _repaintCompositedChild( RenderObject child, { bool debugAlsoPaintedParent = false, PaintingContext childContext, }) { OffsetLayer childLayer = child._layer as OffsetLayer; if (childLayer == null) { child._layer = childLayer = OffsetLayer(); } else { childLayer.removeAllChildren(); } childContext ??= PaintingContext(child._layer, child.paintBounds); child._paintWithContext(childContext, Offset.zero); childContext.stopRecordingIfNeeded(); } ... }
|
PaintingContext作为canvas的持有者,作为参数传递给RenderObject,这样RenderObject对象通过context.canvas可以取到Canvas对象,可以调用canvas相关API实现绘制操作。
1 2 3 4 5 6 7 8 9 10 11 12
| void _paintWithContext(PaintingContext context, Offset offset) { ... _needsPaint = false; try { paint(context, offset); } ... } void paint(PaintingContext context, Offset offset) { }
|
首先把_needsPaint置为false,当遍历到更高节点向下绘制时起到隔离作用,后面详细讲。
RenderObject的paint()方法是一个抽象方法,需要子类去实现。
如果一个RenderObject含有子节点,那么除了自身可能需要绘制外,还需要遍历子节点进行绘制。
以RenderStack为例看下实现:
1 2 3 4 5 6 7 8 9 10 11 12 13 14 15 16 17 18 19 20
| @override void paint(PaintingContext context, Offset offset) { ... paintStack(context, offset); } @protected void paintStack(PaintingContext context, Offset offset) { defaultPaint(context, offset); } void defaultPaint(PaintingContext context, Offset offset) { ChildType child = firstChild; while (child != null) { final ParentDataType childParentData = child.parentData as ParentDataType; context.paintChild(child, childParentData.offset + offset); child = childParentData.nextSibling; } }
|
由于RenderStack本身没有内容需要绘制,所以直接遍历子节点调用context.paintChild方法绘制子节点。
同时将Layout阶段子节点存储的位置和大小信息parentData取出来,加上自身偏移传递给子节点,parentData是layout阶段计算出的位置信息。
所以通过 paint()-> paintChild() -> paint() ->stopRecordingIfNeeded() …调用栈完成局部树的刷新。
为什么说是局部树 ?因为有isRepaintBoundary的存在,每个局部树代表一个图层,下面详细分析。
4、LayerTree
4.1、RepaintBoundary 绘制边界
当_nodesNeedingPaint列表中,深度优先的节点绘制完成后,调用childContext.stopRecordingIfNeeded()方法完成当前局部树的绘制,并记录在Flutter Engine对应Layer的Picture对象中(这块后面再分析)。
然后继续遍历_nodesNeedingPaint中的节点。
由于是深度优先,所以后续被遍历到的节点,可能是已完成绘制节点的祖先节点,那么再去paintChild,会不会再次触发已完成绘制节点的绘制动作?
答案是不会,因为有isRepaintBoundary的存在。
1 2 3 4 5 6 7 8 9 10 11 12 13 14 15 16 17 18 19 20 21 22
| void paintChild(RenderObject child, Offset offset) { if (child.isRepaintBoundary) { stopRecordingIfNeeded(); _compositeChild(child, offset); } else { child._paintWithContext(this, offset); } } void _compositeChild(RenderObject child, Offset offset) { if (child._needsPaint) { repaintCompositedChild(child, debugAlsoPaintedParent: true); } final OffsetLayer childOffsetLayer = child._layer as OffsetLayer; childOffsetLayer.offset = offset; appendLayer(child._layer); }
|
当isRepaintBoundary为false时,正常遍历子节点绘制。
比如首次绘制第一帧时,从根节点RenderView开始从上到下遍历绘制。
当子节点记录为isRepaintBoundary(即之前已经绘制完成的子节点)时,调用_compositeChild方法。
此时child._needsPaint实际上已经为false。
所以直接调用appendLayer()方法合并子节点所在的Layer图层,添加到当前节点所在Layer的子节点,生成一颗LayerTree,同时触发 markNeedsAddToScene()标脏方法,用于合成阶段的标脏操作,下篇文章会详细介绍。
所以,markNeedsPaint() 从叶子节点向上遍历寻找绘制边界,触发局部绘制。
flushPaint()深度优先逆序遍历,找到绘制边界把当前节点作为祖先节点,从上到下绘制局部树。最后绘制RenderView根节点(如果需要)。
每个isRepaintBoundary为true的RendeObject,都会生成一个新的图层,其所有的子节点都会被绘制在这个新的图层中。
Flutter 使用Layer图层来记录一个层次上所有的RenderObject的绘制过程,每个图层独立刷新,互不影响。
Layer 是上篇文章中提到的AbstractNode的子类,它是实现Tree的基类,RenderObject也是其子类。
Layer和RenderObject存在 1:N的对应关系。
所以,也就是说RepaintBoundary Widget可以控制刷新范围,这也是为什么使用RepaintBoundary Widget可以提高绘制性能的真正原因。
4.2、PaintingContext & Canvas 绘制
具体绘制时,通过PaintingContext获取Canvas,调用Canvas的API接口执行具体的绘制操作,看下Canvas对象的获取逻辑
1 2 3 4 5 6 7 8 9 10 11 12 13 14 15 16 17 18 19 20 21 22 23 24 25 26 27 28 29 30 31 32 33 34 35 36 37 38 39 40 41 42 43 44 45 46 47 48 49 50 51 52 53 54 55 56 57
| @override Canvas get canvas { if (_canvas == null) _startRecording(); return _canvas; } void _startRecording() { assert(!_isRecording); _currentLayer = PictureLayer(estimatedBounds); _recorder = ui.PictureRecorder(); _canvas = Canvas(_recorder); _containerLayer.append(_currentLayer); } @protected @mustCallSuper void stopRecordingIfNeeded() { if (!_isRecording) return; assert(() { if (debugRepaintRainbowEnabled) { final Paint paint = Paint() ..style = PaintingStyle.stroke ..strokeWidth = 6.0 ..color = debugCurrentRepaintColor.toColor(); canvas.drawRect(estimatedBounds.deflate(3.0), paint); } if (debugPaintLayerBordersEnabled) { final Paint paint = Paint() ..style = PaintingStyle.stroke ..strokeWidth = 1.0 ..color = const Color(0xFFFF9800); canvas.drawRect(estimatedBounds, paint); } return true; }()); _currentLayer.picture = _recorder.endRecording(); _currentLayer = null; _recorder = null; _canvas = null; }
|
做了几件事情:
- 初始化
当Layer图层中的RenderObject要使用Canvas对象进行绘制时,初始化一个PictureLayer对象,添加到当前LayerTree中。
初始化一个PictureRecorder对象,绑定到Canvas对象上。
PicutreRecorder实际上是Flutter Engine中的PictureRecorder对象的代理。
1 2 3 4 5 6 7 8 9 10 11 12 13 14 15 16 17 18 19 20 21 22 23 24 25 26 27 28 29 30 31 32 33 34 35 36 37 38 39 40 41 42 43 44 45 46 47 48
| static void PictureRecorder_constructor(Dart_NativeArguments args) { UIDartState::ThrowIfUIOperationsProhibited(); DartCallConstructor(&PictureRecorder::Create, args); } IMPLEMENT_WRAPPERTYPEINFO(ui, PictureRecorder); #define FOR_EACH_BINDING(V) \ V(PictureRecorder, isRecording) \ V(PictureRecorder, endRecording) FOR_EACH_BINDING(DART_NATIVE_CALLBACK) void PictureRecorder::RegisterNatives(tonic::DartLibraryNatives* natives) { natives->Register( {{"PictureRecorder_constructor", PictureRecorder_constructor, 1, true}, FOR_EACH_BINDING(DART_REGISTER_NATIVE)}); } fml::RefPtr<PictureRecorder> PictureRecorder::Create() { return fml::MakeRefCounted<PictureRecorder>(); } bool PictureRecorder::isRecording() { return canvas_ && canvas_->IsRecording(); } SkCanvas* PictureRecorder::BeginRecording(SkRect bounds) { return picture_recorder_.beginRecording(bounds, &rtree_factory_); } fml::RefPtr<Picture> PictureRecorder::endRecording(Dart_Handle dart_picture) { fml::RefPtr<Picture> picture = Picture::Create(dart_picture, UIDartState::CreateGPUObject( picture_recorder_.finishRecordingAsPicture()), canvas_->external_allocation_size()); canvas_->Clear(); canvas_->ClearDartWrapper(); canvas_ = nullptr; ClearDartWrapper(); return picture; }
|
同样的,Dart Framework的Canvas对象实际上是Flutter Engine中Canvas对象的代理。
Flutter Engine中的Canvas:
1 2 3 4 5 6 7 8 9 10 11 12 13 14 15 16 17 18 19 20 21 22 23 24 25 26 27 28 29 30 31 32 33 34 35 36 37 38 39 40 41 42 43 44 45 46 47 48 49 50 51 52 53 54 55 56 57 58 59 60 61 62 63 64 65
| static void Canvas_constructor(Dart_NativeArguments args) { UIDartState::ThrowIfUIOperationsProhibited(); DartCallConstructor(&Canvas::Create, args); } IMPLEMENT_WRAPPERTYPEINFO(ui, Canvas); #define FOR_EACH_BINDING(V) \ V(Canvas, save) \ V(Canvas, saveLayerWithoutBounds) \ V(Canvas, saveLayer) \ V(Canvas, restore) \ V(Canvas, getSaveCount) \ V(Canvas, translate) \ V(Canvas, scale) \ V(Canvas, rotate) \ V(Canvas, skew) \ V(Canvas, transform) \ V(Canvas, clipRect) \ V(Canvas, clipRRect) \ V(Canvas, clipPath) \ V(Canvas, drawColor) \ V(Canvas, drawLine) \ V(Canvas, drawPaint) \ V(Canvas, drawRect) \ V(Canvas, drawRRect) \ V(Canvas, drawDRRect) \ V(Canvas, drawOval) \ V(Canvas, drawCircle) \ V(Canvas, drawArc) \ V(Canvas, drawPath) \ V(Canvas, drawImage) \ V(Canvas, drawImageRect) \ V(Canvas, drawImageNine) \ V(Canvas, drawPicture) \ V(Canvas, drawPoints) \ V(Canvas, drawVertices) \ V(Canvas, drawAtlas) \ V(Canvas, drawShadow) ... FOR_EACH_BINDING(DART_NATIVE_CALLBACK) void Canvas::RegisterNatives(tonic::DartLibraryNatives* natives) { natives->Register({{"Canvas_constructor", Canvas_constructor, 6, true}, FOR_EACH_BINDING(DART_REGISTER_NATIVE)}); } fml::RefPtr<Canvas> Canvas::Create(PictureRecorder* recorder, double left, double top, double right, double bottom) { ... fml::RefPtr<Canvas> canvas = fml::MakeRefCounted<Canvas>( recorder->BeginRecording(SkRect::MakeLTRB(left, top, right, bottom))); recorder->set_canvas(canvas); return canvas; } Canvas::Canvas(SkCanvas* canvas) : canvas_(canvas) {}
|
实际上Flutter Engine中的对象都是Skia引擎的代理对象,最终实现绘制的是Skia引擎中的SkCanvas对象。
所有的Dart Framework层的Canvas绘制操作,都会通过Flutter Engine层的Canvas代理类,最终调用到SkCanvas去实际绘制。
- 绘制
当使用Canvas对象绘制时,绘制的指令都会被记录在Flutter Engine 的SkPictureRecorder对象中。
- 结束绘制
当结束当前Layer图层的绘制流程时,调用_recorder.endRecording()获取一个SkPicture对象,SkPicture对象包含了所有的绘制指令,并写入PictureLayer中。
至此所有的Layer图层绘制完成,形成一颗含有所有绘制操作记录的LayerTree。
并且,在当前LayerTree中,每个用到Canvas绘制的Layer图层的同层级中,总是有一个或多个PictureLayer,用来记录绘制信息。
1 2 3 4 5
| set picture(ui.Picture picture) { markNeedsAddToScene(); _picture = picture; }
|
最后调用markNeedsAddToScene()标记该Layer的_needsAddToScene为true,为接下来的renderView.compositeFrame()做准备。
4.3、_needsCompositing 的作用
在markNeedsCompositingBitsUpdate()标记阶段,记录了RenderObject的_needsCompositing是否需要合成的标志位。
其原理是,当一个RenderObject节点是isRepaintBoundary || alwaysNeedsCompositing,那么它及其所有的祖先节点都会被标记为_needsCompositing。
这个标志位的作用在PaintingContext中的pushXXX特殊绘制相关方法中会用到,用于标识是否需要新建一个Layer图层来实现一些特定的图形效果,比如裁剪,变换等。
以pushClipRect裁剪方法为例:
1 2 3 4 5 6 7 8 9 10 11 12 13 14 15 16 17 18 19 20 21 22 23 24 25 26 27 28 29 30 31 32 33 34 35 36
| ClipRectLayer pushClipRect(bool needsCompositing, Offset offset, Rect clipRect, PaintingContextCallback painter, { Clip clipBehavior = Clip.hardEdge, ClipRectLayer oldLayer }) { final Rect offsetClipRect = clipRect.shift(offset); if (needsCompositing) { final ClipRectLayer layer = oldLayer ?? ClipRectLayer(); layer ..clipRect = offsetClipRect ..clipBehavior = clipBehavior; pushLayer(layer, painter, offset, childPaintBounds: offsetClipRect); return layer; } else { clipRectAndPaint(offsetClipRect, clipBehavior, offsetClipRect, () => painter(this, offset)); return null; } } void pushLayer(ContainerLayer childLayer, PaintingContextCallback painter, Offset offset, { Rect childPaintBounds }) { if (childLayer.hasChildren) { childLayer.removeAllChildren(); } stopRecordingIfNeeded(); final PaintingContext childContext = createChildContext(childLayer, childPaintBounds ?? estimatedBounds); painter(childContext, offset); childContext.stopRecordingIfNeeded(); }
|
如果被标记为合成,那么就新建一个Layer,设置裁剪信息,并绑定到新的PaintingContext上,持有独立的Canvas,进行特殊效果绘制。
使用方是RenderClipRect.paint()
1 2 3 4 5 6 7 8 9 10 11 12 13 14 15 16 17 18 19 20
| class RenderClipRect extends _RenderCustomClip<Rect> { @override void paint(PaintingContext context, Offset offset) { if (child != null) { _updateClip(); layer = context.pushClipRect( needsCompositing, offset, _clip, super.paint, clipBehavior: clipBehavior, oldLayer: layer as ClipRectLayer, ); } else { layer = null; } }
|
思考一下为什么子节点在独立图层上绘制,这些特殊绘制操作也需要在独立图层上绘制?
先看下不独立绘制,直接在原有Canvas上裁剪、绘制的实现
1 2 3 4 5 6 7 8 9 10 11 12 13 14 15 16 17 18 19 20 21 22 23 24
| void clipRectAndPaint(Rect rect, Clip clipBehavior, Rect bounds, void painter()) { _clipAndPaint((bool doAntiAias) => canvas.clipRect(rect, doAntiAlias: doAntiAias), clipBehavior, bounds, painter); } void _clipAndPaint(void canvasClipCall(bool doAntiAlias), Clip clipBehavior, Rect bounds, void painter()) { ... case hardEdge: canvas.save(); canvasClipCall(false); break; case Clip.antiAliasWithSaveLayer: canvasClipCall(true); canvas.saveLayer(bounds, Paint()); break; ... painter(); canvas.restore(); }
|
这里就明白了,在子节点没有独立绘制情况下,裁剪操作需要做到在不影响子节点绘制的情况下,借助canvas的save()和restore()方法来实现。
并且在一些场景下会触发saveLayer,也就是离屏渲染,这个操作对性能影响巨大。
而在子节点在独立图层绘制的情况下,特殊效果绘制也就在新建的独立图层上绘制就好了,不用再save()和restore()了,更不用saveLayer了,对性能更友好。
并且由于裁剪等特殊绘制在独立图层的存在,可以把绘制范围切分的更细粒度,而在Flutter Engine里对于图层是有缓存的,也可以提高绘制性能。
4.4、Layer 种类
Layer 大体上分为两种类型,ContainerLayer 和非ContainerLayer:
- 非ContainerLayer,用于绘制,一般为LayerTree每一层的尾节点,也有可能在中间节点,比如stopRecording后,再appendLayer
- PictureLayer,用于记录一般绘制操作,大部分RenderObject都是绘制在这上面
- TextureLayer,主要用于外接纹理绘制,对应的RenderObject是TextureBox,Widget 是 Texture
- PlatformViewLayer,用于嵌入平台 (Android、iOS) 纹理绘制,对应的RenderObject是PlatformViewRenderBox,Widget 是 PlatformViewSurface
- ContainerLayer,本身不具备绘制能力,一般用于添加非ContainerLayer,形成LayerTree
- ClipRectLayer、ClipRRectLayer、ClipPathLayer,裁剪层,可以指定裁剪和矩形行为参数。共有4种裁剪行为,none、hardEdge、antiAlias、antiAliashWithSaveLayer(会触发SaveLayer)
- OffsetLayer,偏移层,可以指定坐标偏移量
- TransformLayer,变换图层,可以指定变换矩阵参数
- OpacityLayer,透明层,可以指定透明度
- PhysicalModelLayer,透明层,可以指定透明度
- ColorFilterLayer,颜色过滤层,可以指定颜色和混合模式参数
- BackdropFilterLayer:背景过滤层,可以指定背景图参数
5、总结
本文主要分析了合成标记、paint绘制、LayerTree等相关内容,下篇文章继续分析具体的合成阶段。
本文链接: http://w4lle.com/2021/02/01/flutter-ui-paint/
版权声明:本文为 w4lle 原创文章,可以随意转载,但必须在明确位置注明出处!
本文链接: http://w4lle.com/2021/02/01/flutter-ui-paint/

